
Maple Carrot Cupcakes

Medically reviewed by Christiana George Updated Date: December 19, 2022


The weather is finally warming up. We are the 80’s this week. And this South Carolina sun is a scorcher. I really need to buy a truck load of sunscreen this year. The only downside to the nice weather is the pollen count. Apparently allergies are worst here than New England. I have been sluggish for two weeks now. I feel like just laying down and sleeping all the time. And my allergies are not even as bad as my husband’s or son’s. So I can just imagine how they feel. I did find some energy to make these Maple Carrot Cupcakes though. I love carrot cake and what better way to enjoy it than with some pure maple syrup.

I went back to my mom’s original carrot cake recipe and adapted it slightly to add some maple syrup. My other adaptation were these Carrot Cake Muffins.

I only used baking soda in this recipe instead of baking soda and baking powder. I wanted a flatter cupcake. Also, instead of shredding my carrots, I chopped them in the food processor which resulted in a finer, minced carrot consistency and more carrot per cup. You can shred yours if you want though. Besides substituting some of the original sugar content with maple syrup, I also substituted some with brown sugar.

For the frosting I just made my favorite Cinnamon Mascarpone Frosting, but you can also add a little maple syrup to it like I did for the Carrot Cake Muffins. I love it because it’s so light and fluffy. I used an Ateco frosting tip #827 to decorate and Wilton Spring Mix sprinkles. The cupcake liners are Wilton also. I found them at Walmart.

The cupcakes came out super moist and full of carrot flavor. They are not overly sweet, just the right amount. You also get some nice chunks of pecan and raisins. The frosting is a perfect compliment. I handed them all out to the neighbors and had requests for seconds. That’s success!
Maple Carrot Cupcakes
by The Sweet Chick
Prep Time: 20 minutes
Cook Time: 15-20 minutes
Keywords: bake dessert carrots cinnamon maple syrup pecans Easter cupcake American spring
Ingredients (32 cupcakes)
For the cupcakes
- 1 cup sugar
- 1/2 cup brown sugar
- 1 cup all purpose flour
- 1 1/14 cup whole wheat flour
- 1/2 teaspoon salt
- 2 teaspoons baking soda
- 2 teaspoons ground cinnamon
- 4 eggs, beaten
- 1 cup vegetable oil
- 1 cup maple syrup
- 2 teaspoons vanilla
- 3 cups grated/minced carrots
- 1 cup raisins
- 1/2 cup chopped pecans
For the frosting
- 2 cups heavy cream
- 16 ounces mascarpone cheese, room temperature
- 1 cup confectioners’ sugar, sifted
- 1/2 tsp. cinnamon
Instructions
For the cupcakes
Preheat oven to 350ºF.
Place sugars, flours, baking soda, salt, and cinnamon in stand mixer bowl. Mix on low till well blended.
Add beaten eggs, oil, maple syrup, and vanilla. Mix on low for 2 minutes. Then stop and scrape down sides. Continue mixing on low until mixture is well blended.
Add carrots, raisins, and pecans. Mix until all are incorporated.
Pour mixture into greased or lined muffin tins.
Bake on 350ºF for 15-20 minutes or until toothpick inserted in center comes out clean. (My top oven took 20 min., the bottom one baked in 15 min.)
Then take out of oven and place on cooling rack.
For the frosting
With stand mixer on medium speed (with whisk attachment), whisk heavy cream until stiff peaks form (be careful not to over beat, or cream will be grainy).
In another bowl, stir together mascarpone, cinnamon, and confectioners’ sugar until smooth.
Gently fold whipped cream into mascarpone mixture until completely incorporated.
Use immediately on cooled cupcakes. (If you are not doing any fancy piping, just using a spatula, you may want to half the frosting recipe. Or you can save the extra to use as a fruit dip.)
After frosting the muffins, keep them refrigerated.
This recipe may be shared at these fabulous link parties.
Related Posts


Subscribe for New Racipies
Get mental health tips, updates, and resources delivered to your inbox.
Don’t Think Fat, Think Pork Belly: Dongpo Pork


Though my sister and I were never picky eaters, my mom had to apply her persuasion skills every now and then to get us to eat the food she’d prepared. Every parent must have to figure out an angle, some way of coaxing their child into eating the undesirable, or else dinner quickly descends into an unpleasant affair.
My mom appealed to our vanity. Everything was “good for the skin”—tomatoes gave you a rosy blush, tofu made it silky. And pork belly, well, apparently the fat operated as some kind of lubricant, turning your skin soft and plush. She also insisted that what we were eating wasn’t fat, just the extremely thick epidermis of the pig.
C’mon.
I wasn’t stupid, even at the grand age of ten. But it wasn’t like I needed the prodding anyway. I loved meat, especially pork belly. Although I never registered that what I was eating was pork belly. You don’t think about such things when you’re a kid. It was only later, now, that I realize what cut of meat my mom constantly cooked.

I’m not going to lie, dongpo pork is really fatty. But that’s what makes it so good! Pork belly is used a lot in Chinese cooking: twice-cooked pork (my dad’s favorite), red-braised pork (my sister’s favorite), and dongpo pork. I was reminded of the prevalence of pork used in Chinese cooking while going through all these recipes—the Chinese character for meat usually signifies pork unless otherwise noted.
I never knew the origin story of this dish, but it’s actually named after the Chinese poet Su Dongpo, who apparently was banished to Hangzhou, then considered the boondocks I guess, to lead a life of poverty. He was a great chef, and actually invented dongpo pork as he was trying to improve on red-braised pork.
As the meat braised, it filled the apartment with the fragrant smell of Shaoxing wine… and made me feel slightly homesick. So I called my mom to tell her what I was doing, and you know what her response was? “Don’t eat too much of it! It will raise your cholesterol!”
C’mon, Mom. It’s good for my skin, remember?
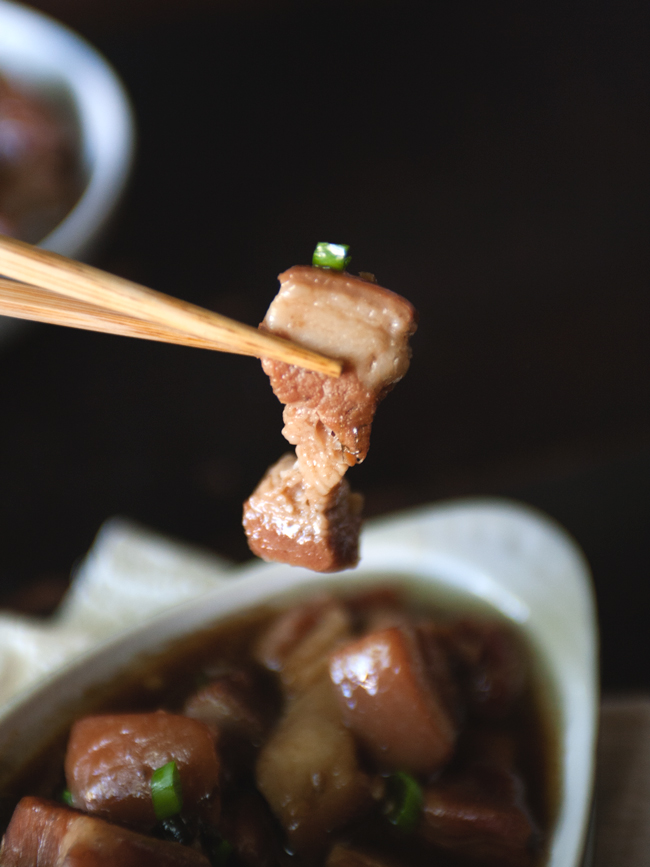

DONGPO PORK, a.k.a. BRAISED PORK BELLY
Adapted from Maameemoomoo
Serves 4
Ingredients:
1.5 lb. pork belly
1 Tbsp canola oil
2 scallions, chopped into 1-inch pieces
3 cloves garlic, peeled
3 Tbsp rock sugar or brown sugar
3 Tbsp soy sauce
3.5 cups lukewarm water
3 cups boiling water
1.5 Tbsp dark soy sauce
1/2 cup shaoxing wine
1 Tbsp cornstarch
Directions:
In a wok on medium heat, add oil. Saute scallions, ginger and garlic for 2-3 mins until fragrant. Add sugar and further saute until sugar starts to melt. Add soy sauce, dark soy and wine. Bring to a boil. Once boiling, turn off heat and add lukewarm water. Set aside.
While sauce is coming to a boil, slice pork belly into pieces about 2 inches thick. Place pork belly pieces on a chopping board or a baking pan and scald them on all sides with boiling water.
Place the pork pieces skin side down in a pan large enough to fit all the pieces together and add the earlier sauce mixture. Bring to boil. Once boiling, turn down the heat to a low simmer and braise the pork for 30 mins, covered. After 30 minutes, flip the pork belly pieces over and continue braising, covered, for a minimum of 3 hours, basting the skin occasionally.
When ready, remove pork belly pieces gently and set aside. Strain remaining sauce into a saucepan and bring to a low simmer. Mix cornstarch with 1/4 cup water and gently pour it into the sauce. Stir well until sauce becomes a shiny, sticky glaze. Turn off heat. To serve, gently place the pork belly onto a plate and spoon the sauce over. Serve with rice or noodles (my favorite!).
Related Posts
Subscribe for New Racipies
Get mental health tips, updates, and resources delivered to your inbox.