
Ramp Pesto

Medically reviewed by Christiana George Updated Date: June 8, 2023

Nature a contrarian, I find myself very skeptical of hype. This was the case with boy bands and this was the case with ramps (why boy bands comes to mind, I have no idea. And actually, I did have a small crush on Brian of the Backstreet Boys that I’m now just a teeny bit embarrassed to own up to). With all the hooplah surrounding what’s-just-another-member-of-the-allium-family, I admit, I was pretty disinterested in trying them, especially if it meant fighting over the last few stalks with someone more aggressive than me because they wanted them more than me. Because these guys go fast. Watching them sell at the farmer’s market is like watching a time lapse video.
But being a food blogger is akin to being an investigative journalist, at least in matters of food. You follow all leads, and you don’t hold yourself back from anything. (And yes, I did just make that comparison!) In this case, with a trustworthy source as my lead, I decided to pick up a couple bunches.


Now, a few facts about ramps that I find remarkable: (as usual, thanks Food52)
1. They’re only found in specific parts of the U.S., namely the Northeast.
2. They’re only in season for something like three weeks each spring.
3. They are almost completely foraged, which means they’re wild, which leads me to the next fact…
4. Ramps take FIVE TO SEVEN YEARS to grow before they’re ready to be harvested. And it can take 18 MONTHS just for them to germinate.
Wow. In that context, it’s easy to understand why people go crazy over them. Although, scarcity doesn’t necessarily imply that they’re any good. But in this case, Carey, you were right! Ramps don’t quite taste like anything else, and they’re wonderful. They’re also extremely pungent. Even before you taste them, you smell them, sharply, overwhelmingly, scented garlic but not raw. They smell like garlic bread, in fact, sort of roasted and intense. They taste so much stronger than their domesticated cousins too. Piquant, kind of like what arugula is to regular greens. They remind me of Chinese leeks, a great favorite of mine growing up that my mom used to scramble with eggs and serve alongside rice porridge (which somewhat made up for the fact that we were forced to eat watery tasteless GRUEL when Mom didn’t feel like cooking. But this is old baggage; I won’t go into it.) Anyway, I highly recommend breath mints.
Which is why pesto seemed the perfect food to take advantage of ramp’s rather distinctive qualities. Doesn’t it just sound good? There can’t be a better fate, in my humble opinion. I didn’t have pine nuts lying around, so I used walnuts instead, but besides that, I followed the traditional pesto recipe pretty closely. (Well, I guess the traditional way of making pesto involves a mortar and a pestle, but there were no Italian nonni around to judge.)
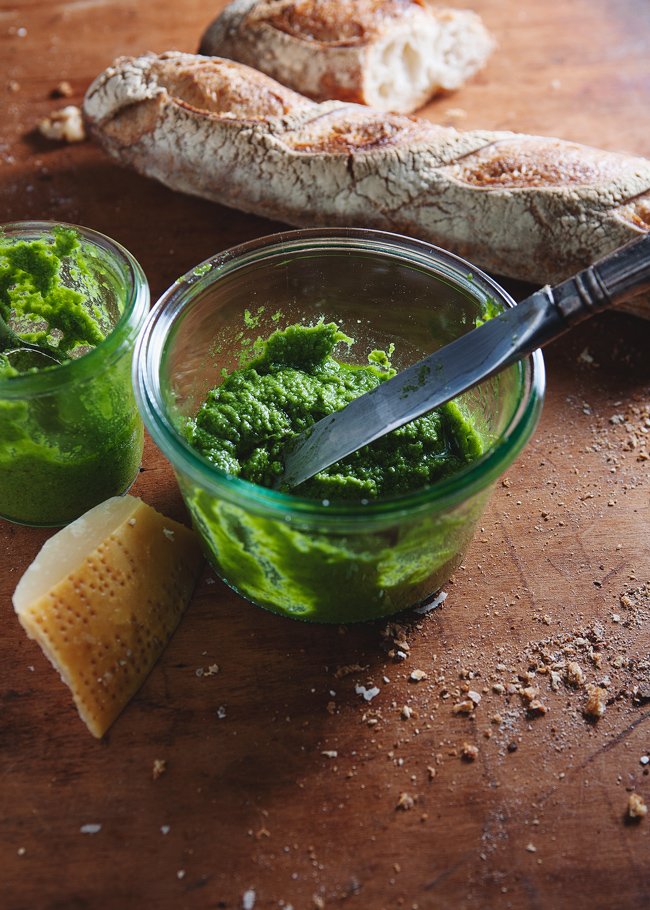
I’m only now questioning the color of this pesto. It’s awfully bright and swampy isn’t it? And yet, that was its exact hue when it was first blended. Weird. But it does mature into a darker green after awhile.


RAMP PESTO
Adapted from Food52
Makes around 1/2 cup (I’m completely estimating—I would say it’s enough for topping one medium pizza, serving 2 to 3 with pasta, and feeding quite a few with bread)
Ingredients:
1 bunch of ramps (about 10 stalks)
1/2 cup toasted walnuts
1/2 cup grated Parmesan
1/3 to 1/2 cup olive oil (I used about 1/2 cup)
Salt & pepper
Squirt of lemon
Directions:
Wash the ramps and cut the hairy ends off the bulbs. Roughly chop the leaves and remainder of the bulbs. Also roughly chop the walnuts, then place both the ramps and walnuts in a food processor. Pour in the cheese and start processing, slowly pouring in olive oil until you’ve reached a consistency you like. Taste for salt and pepper, and squirt in some lemon juice to taste.
I would let the pesto sit for a little while, maybe an hour, before eating. The flavors need some time to meld together.
Related Posts


Subscribe for New Racipies
Get mental health tips, updates, and resources delivered to your inbox.
Are Oat Waffles Acidic? A Healthy Breakfast Option?


Oat waffles are a popular choice for those seeking a healthy, hearty, and delicious breakfast. Made with oats instead of traditional refined flour, these waffles are packed with nutrients and fiber, making them a wholesome option for many. But if you suffer from acid reflux or GERD (gastroesophageal reflux disease), you might be wondering: Are oat waffles acidic, and can they trigger reflux symptoms?
In this article, we’ll uncover the truth about the acidity of oat waffles, their potential impact on acid reflux, and how to make them a reflux-friendly addition to your breakfast. We’ll also discuss their health benefits, provide reflux-safe recipes, and answer some commonly asked questions about oat waffles and acid reflux.
Are Oat Waffles Acidic or Alkaline?
1. The Acidity of Oats
Oats, the primary ingredient in oat waffles, are considered to be slightly acidic, with a pH ranging between 6.0 and 6.4. While they fall on the acidic side of the pH scale, their acidity is mild and not typically a cause for concern for individuals with acid reflux.
2. Impact of Cooking on Acidity
The process of cooking oats into waffles does not significantly alter their pH. However, the toppings and ingredients used in making oat waffles can either enhance or reduce their acidity.
3. Oats as a Reflux-Friendly Food
Oats are a widely recommended food for acid reflux sufferers because of their high fiber content and ability to absorb excess stomach acid. Therefore, oat waffles, when prepared mindfully, can be a suitable breakfast option for those managing reflux.
Related to Read: Are Oat Cookies Acidic?
Can Oat Waffles Trigger Acid Reflux?
Oat waffles are generally considered safe for individuals with acid reflux. However, certain factors may increase the likelihood of triggering symptoms:
1. Ingredients in the Batter
The batter used to make oat waffles can impact their reflux-friendliness. Ingredients like whole milk, butter, or sugar can increase acidity and make the waffles less suitable for reflux sufferers.
2. Toppings
Toppings such as chocolate syrup, whipped cream, or acidic fruits like citrus can trigger reflux symptoms. Reflux-friendly toppings like bananas, almond butter, or a drizzle of honey are better alternatives.
3. Portion Size
Eating large portions of any food, including oat waffles, can put pressure on the stomach and worsen reflux symptoms. Stick to a reasonable portion size to avoid discomfort.
Author Tip: Is Oatmeal Acidic?
Why Oat Waffles May Be Good for Acid Reflux?
Oat waffles, when prepared with reflux-safe ingredients, offer several benefits for individuals managing acid reflux:
1. High Fiber Content
Oats are an excellent source of dietary fiber, which promotes healthy digestion and reduces the risk of acid reflux by preventing constipation and improving gut motility.
2. Low in Fat
Low-fat foods are less likely to relax the lower esophageal sphincter (LES), a key factor in acid reflux. Oat waffles made without high-fat ingredients like butter or cream are a great low-fat option.
3. Nutrient-Dense
Oats are packed with essential nutrients, including:
- Magnesium: Helps regulate stomach acid production.
- Vitamin B6: Supports healthy digestion.
- Iron: Boosts energy levels and supports overall health.
4. Satisfying and Filling
The high fiber content in oats keeps you full for longer, reducing the likelihood of overeating and minimizing pressure on the stomach, which can lead to reflux.
5. Versatile and Customizable
Oat waffles can be easily adapted to suit dietary needs and preferences. By choosing reflux-friendly ingredients, you can enjoy a delicious and safe breakfast option.
Tips for Making Reflux-Friendly Oat Waffles
To ensure oat waffles are safe for acid reflux sufferers, follow these tips:
1. Use Plant-Based Milk
Swap out whole milk for plant-based alternatives like almond milk or oat milk, which are less likely to trigger reflux.
2. Avoid High-Fat Ingredients
Replace butter with a small amount of coconut oil or unsweetened applesauce to keep the fat content low.
3. Choose Reflux-Friendly Sweeteners
Opt for natural sweeteners like honey or maple syrup instead of sugar or artificial sweeteners.
4. Stick to Non-Acidic Toppings
Top your oat waffles with bananas, blueberries, or almond butter instead of acidic fruits or processed toppings.
5. Watch Your Portion Size
A serving of 2 medium-sized oat waffles is typically enough to satisfy hunger without causing discomfort.
Reflux-Friendly Oat Waffle Recipe
Here’s a simple and reflux-safe recipe for oat waffles:
Ingredients
- 1 cup rolled oats (blended into flour)
- 1 cup almond milk (unsweetened)
- 1 egg (or flax egg for a vegan option)
- 1 teaspoon baking powder
- 1 teaspoon vanilla extract
- 1 tablespoon honey or maple syrup
Instructions
- In a blender, blend rolled oats until they turn into a fine flour.
- In a mixing bowl, combine oat flour, baking powder, almond milk, egg, vanilla extract, and sweetener. Mix until smooth.
- Preheat your waffle maker and lightly grease it with coconut oil.
- Pour the batter into the waffle maker and cook until golden brown.
- Serve with reflux-friendly toppings like bananas, almond butter, or a drizzle of honey.
This recipe makes about 2-3 servings of fluffy and delicious waffles that are gentle on the stomach.
Oat Recipe: Honey Carrot Oatmeal Raisin Cookies
Biscoff Oatmeal Double Chocolate Chip Cookies
Health Benefits of Oat Waffles Beyond Acid Reflux
Studies suggest that oats offer a variety of health benefits that extend beyond managing acid reflux:
1. Supports Heart Health
Oats are rich in beta-glucan, a type of soluble fiber that helps lower cholesterol levels and supports cardiovascular health.
2. Aids in Weight Management
The fiber in oats promotes satiety, helping to control hunger and prevent overeating.
3. Boosts Energy Levels
Oats provide a slow release of energy, making oat waffles an ideal breakfast choice to keep you energized throughout the day.
4. Improves Gut Health
The fiber in oats supports a healthy gut microbiome, promoting regular bowel movements and overall digestive health.
FAQs About Oat Waffles and Acid Reflux
1. Are oat waffles acidic?
Oat waffles are mildly acidic due to the pH of oats, but they are generally well-tolerated by individuals with acid reflux.
2. Can oat waffles trigger acid reflux?
Oat waffles are unlikely to trigger acid reflux when prepared with reflux-friendly ingredients and consumed in moderation.
3. What are the best toppings for oat waffles if I have acid reflux?
Reflux-friendly toppings include bananas, almond butter, unsweetened applesauce, or a light drizzle of honey. Avoid acidic fruits, chocolate syrup, and whipped cream.
4. Are store-bought oat waffles safe for acid reflux?
Store-bought oat waffles may contain added sugars, fats, or preservatives that can trigger reflux. Always check the ingredient label or make your own at home for better control.
5. Can I eat oat waffles every day?
Yes, oat waffles can be enjoyed daily as part of a balanced diet. Just ensure they’re made with reflux-friendly ingredients and consumed in moderation.
Conclusion
Oat waffles are a mildly acidic yet nutrient-rich breakfast option that can be safely enjoyed by most individuals with acid reflux. When prepared with reflux-friendly ingredients and paired with non-acidic toppings, they make for a delicious and satisfying meal that supports healthy digestion.
Whether you enjoy them as a quick weekday breakfast or a leisurely weekend treat, oat waffles can be a versatile and reflux-safe addition to your diet. With their high fiber content, low fat, and customizable nature, oat waffles are a perfect choice for starting your day on a healthy note.
If you’re looking for more reflux-friendly meal ideas, explore our other articles for expert tips and recipes tailored to your needs!
Related Posts


Subscribe for New Racipies
Get mental health tips, updates, and resources delivered to your inbox.