
Curried Cauliflower Agnolotti With Cilantro Brown Butter Sauce

Medically reviewed by Christiana George Updated Date: June 8, 2023
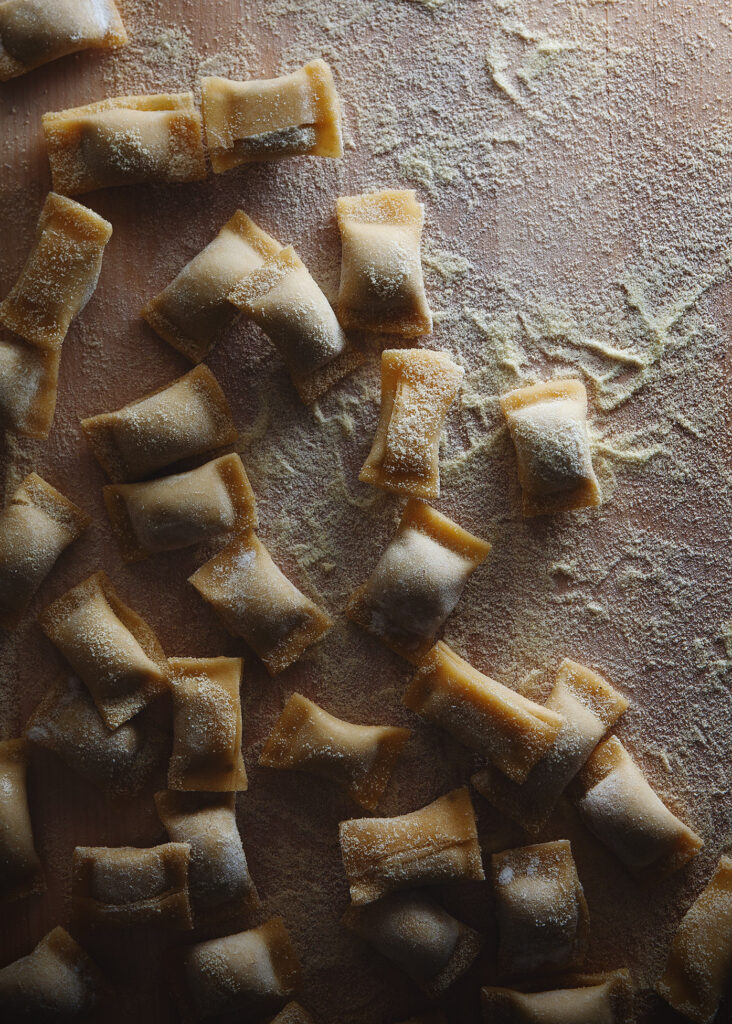
I’m not gonna lie, this recipe is quite a bit of work. If you’ve ever made ravioli before, then you know the amount of effort that’s involved: there’s the making of the filling, the making of the dough, the rolling of the dough, and the filling of the dough. And then you have to boil some water and cook it, while making the sauce as well. But that last bit is the easy part.
With all that being said, this recipe is perhaps the first I’ve ever made that involved quite a lot of jiggering, and, if I may toot my own horn, it’s delicious! It can also be made in parts, so you can steal parcels of time here and there to put it together. So click on through for my oh-so scintillating commentary, the rest of the photos—because I really don’t feel like bombarding the homepage of my blog with tons of process shots (there aren’t that many, but enough to be annoying)—and the recipe.

This post was originally inspired by Katie, who recently made a Thomas Keller agnolotti recipe with the last of her fava beans that totally blew me away. Enamored with the shape of the pasta—agnolotti is basically a type of ravioli—I decided to make my own. For my first try, I blended Carrie’s zucchini and herb sauce with a whole lot of ricotta cheese to make a perfect in-denial-about-summer-being-over filling. The biggest problem with the pasta was the fact that I rolled the sheets too thin, hence bursting a lot of the agnolotti while making them.
For my second endeavor, I ironically was trying to use up old cauliflower on the verge of going bad. There were actually two heads of cauliflower involved in the making of this recipe, the purple one above, and a mustard yellow one. Have you seen the yellow variety? They are gorgeous. The one I used was not. Hence no picture. But I managed to salvage most of it, and so a medley of purple and yellow cauliflower went into the oven for a nice long roast along with half an onion and a slew of curry spices. Cauliflower pairs so excellently with South Asian spices, don’t you know?

Making the agnolotti isn’t difficult, but it takes a little practice. First you pipe the filling in a straight line down the length of a sheet of pasta.

Something you have to keep in mind is that you’re making two rows of agnolotti with each sheet. So when you fold the pasta over the filling for the first half, you’re taking care that you only fold up to the halfway line. I hope I’m not confusing you. Sometimes pictures really are better than words.

Cut the pasta in half with a sharp knife. The remaining half will get the same treatment.

The part with the filling gets folded over the seamed edge.

And then you form the individual agnolotti.

Push down with your fingers but take care not to squeeze too hard or you’ll break the pasta. Be one with the pasta; you’ll get a feel for how it stretches and becomes taut to accommodate the filling.

Cut out the pieces.

Give each piece a nice solid pinch to ensure that the seams stay together.

And there you have it, agnolotti! Perfect plump little cushions that remind me of pillowcases. This recipe luckily makes a lot, so freeze whatever you don’t eat.


CURRIED CAULIFLOWER AGNOLOTTI
Filling inspired by Bon Appétit
Makes approximately 120 agnolotti
For the dough:
Ingredients:
3 eggs
3 cups of flour
3 T olive oil
3 T water
Directions:
Combine the ingredients in a food processor and pulse until it comes together. Knead for a short while on a floured surface, cover with plastic wrap or a kitchen towel, and let it rest about half an hour.
Cut the dough into 6 equal sections. Roll the dough out to the second thinnest setting if you’re using a pasta roller. Cut off scraggly ends and cut the pasta into 12-inch long sections. You’re aiming for a perfect rectangle. If you’re rolling the dough out by hand, aim for long rectangular strips. Cut the sheets into 12-inch by 6-inch rectangles. Keep the sheets covered so they don’t dry out.
For the filling:
Ingredients:
4 cups cauliflower florets (from 1 medium to large head of cauliflower)
1/2 onion, chopped into large even pieces and separated
1 tsp ground coriander
1 tsp ground cumin
2 tsp curry powder
2 tsp Hungarian paprika
1 tsp salt
1/4 cup olive oil
2 Tbsp red wine vinegar
1 lb. ricotta
Directions:
Preheat oven to 400 degrees F. Dump the cauliflower and onion into a roasting pan. Combine the coriander, cumin, curry powder, paprika, and salt in a bowl and whisk in the olive oil and red wine vingar. Pour it over the vegetables and toss evenly, then lay the vegetables as evenly as possible across the pan and roast for 1 hr, rotating the pan occasionally, until tender. (Keep an eye on the time after 45 minutes—my oven hasn’t been behaving recently and that may have lengthened my bake time.)
Let the vegetables cool, then pulse them in a food processor about 1 minute until very fine. In a large bowl, mix the processed veggies and ricotta evenly. Refrigerate until firm.
Assembling the agnolotti:
The pictures above actually illustrate the process pretty well, but if you’re confused, this link that Katie shared, The Kitchn’s step-by-step guide (with pictures), is helpful.
Start with a sheet of pasta, long side facing you. Fill a pastry bag fitted with a thick-ish tip (I used an Ateco 806) with a decent amount of the filling and pipe a line down the length of the sheet. Like I mentioned above, you’ll be cutting the pasta sheet in two and filling both, so with that in mind, pipe along the bottom of the pasta, about an inch from the edge. Start and end about 3/4-inch on both sides. Also, the turmeric dyed my pastry bag yellow, so use a dedicated pastry bag for this recipe or a disposable one.
Fold the pasta over the filling, ending the fold at the halfway line, and push down firmly to secure the seam. Gently nudge the filling so that it’s resting against the fold. Using a sharp knife (or a ravioli wheel, which results in a far prettier pasta in my opinion; I also think it helps keeps the shape together better), cut the sheet of pasta in half. Set aside the unused half.
Gently fold the side with the filling over the side without to a form a long cylinder with the seam underneath. Pinch the edges of the cylinder hard. Then, take a finger and gently push down about an inch from one of the ends to form a pocket of filling. The pasta will stretch, but be gentle or it will burst. Roll your finger back and forth firmly to increase the width of the pinched area. You want to make it fairly wide since you’ll be cutting into it.
With a sharp knife, cut in the middle of each pinched area to form the individual agnolotti. (Again, the ravioli wheel probably helps hold the seams better) Give each agnolotti’s seams a nice firm pinch to secure the seams. Rest the agnolotti in one layer on a baking sheet sprinkled with semolina.
Repeat with the other half of the sheet, and the rest of your sheets.
The agnolotti can be boiled then and there. Since the pasta is fresh, it’ll cook up in just a few minutes. Otherwise, lay the agnolotti in a single layer across a baking sheet that’s been sprinkled with semolina, cover it with plastic wrap, and store it in the freezer. Frozen ravioli will take about 7 minutes to cook thoroughly.
Here’s how I boil the agnolotti, since it’s really delicate: when the water comes to a boil in the pot, lower the flame to medium-low, and gently plop the agnolotti in (I cook 20 at a time in a medium pot). Wait about 30 seconds, then gently give them a stir. You don’t want the agnolotti sticking to the bottom of the pot or it will RIP and send pate-colored residue spewing all over. (It’s kind of gross but kind of fascinating.) Stir every minute or so until they’re done.
Extra filling can be mixed with pasta water to make an easy sauce.
CILANTRO BROWN BUTTER SAUCE
Makes enough for two people and approx. 40 agnolotti
I promise the sauce isn’t an afterthought!
Ingredients:
3 Tbsp butter
1 cloves of garlic, thinly sliced
A big handful of cilantro
Maldon salt & pepper to taste
Directions:
While the ravioli cooks, in a small pot on a medium flame, melt the butter. Add the garlic when the butter is mostly melted and swirl the pot. Keep swirling once the butter starts to turn brown. When it reaches a medium brown, turn the heat off, add the cilantro and salt (it’ll cause some crazy bubbling), and keep swirling until the brown butter calms down. Add pepper to taste.
To serve, drain the ravioli fully, and lay however many you want to eat (a lunch-sized portion for me consists of about 15) in a plate. Spoon a few spoonfuls of brown butter over each serving. You can top it with more pepper, because there is nothing in the world that doesn’t benefit from fresh pepper.
ENJOY!
Related Posts






Subscribe for New Racipies
Get mental health tips, updates, and resources delivered to your inbox.
Yerba Mate

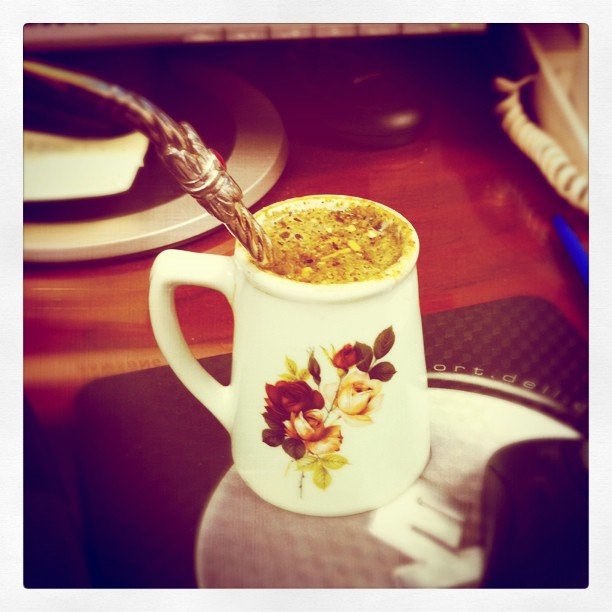
When my Argentinian in-laws first introduced me to this drink, I did not like it at all. It was much too bitter and I didn’t like the idea of everyone sharing one straw. After working with them for several years and seeing them drink it all day, I did try it again and again. One day I finally took a liking to it. My sisters-in-law add a little sweet and low to the carafe of water that is poured in the mate or add an orange peel to the mate itself. My husband likes it plain and bitter.
It is supposed to be good for weight loss, although all the baked goods I have been making lately and bringing to the office kind of cancel that out. It does have caffeine, so at least it keeps me going all day.
Yerba Mate is kind of like a tea. The leaves come from a small tree or shrub. The ground up leaves are placed in a vessel called a mate. There are different kinds of vessels. I have one that is a hollowed out gourd, another that is wood on the inside and silver on the outside, another that is all glass. This one that we use at the office is porcelain. The water is heated up, but not to a boiling point. Then the water is poured over the mate leaves. You drink from the mate with a straw called a bombilla. It has a filter at the bottom to strain out any bits of leaves and it is usually made of silver. Once one person drinks from the mate the water is then refilled and passed onto the next person.
There is a whole ritual for the preparing, serving and drinking of the mate. You can check out these 2 sites:
Argentinians are pretty serious about their mate, the bring it everywhere, even to the beach. When I went to Buenos Aires last year I saw people on the street carrying thermoses and their mate, drinking as they walked. It’s almost like a drug.
I am used to drinking now and drink it everyday at the office. It is supposed to have a lot of health benefits. And it does go well with sweets!
Related Posts
Subscribe for New Racipies
Get mental health tips, updates, and resources delivered to your inbox.