
Cotton Candy Oreo Truffles

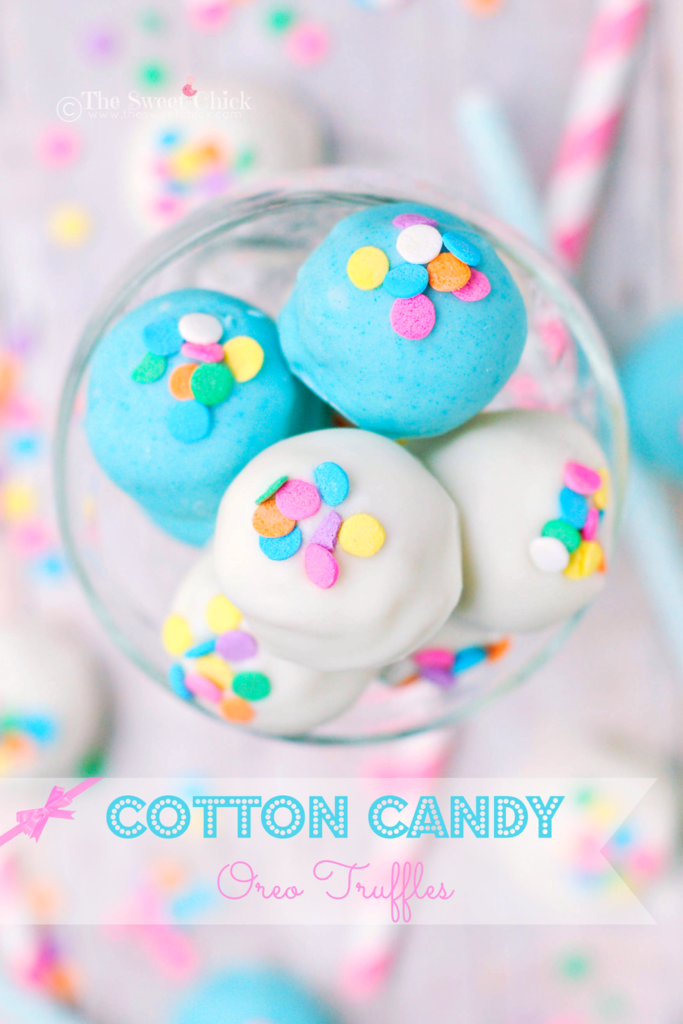
Have you guys tried the Cotton Candy flavored Oreo cookies yet? They aren’t bad. My kids love them. The cream does taste like cotton candy, but not overly sweet. I thought I’d make them even better by turning them into truffles. I even made some cotton candy flavored candy melt to cover them in. These Cotton Candy Oreo Truffles could be a hit at your kid’s birthday party. Or you could just keep them all for yourself.

I don’t why the limited edition Oreos come in smaller packages than the regular Oreo cookies. You lose about 10 cookies, so not fair. I bought these at Target by the way.
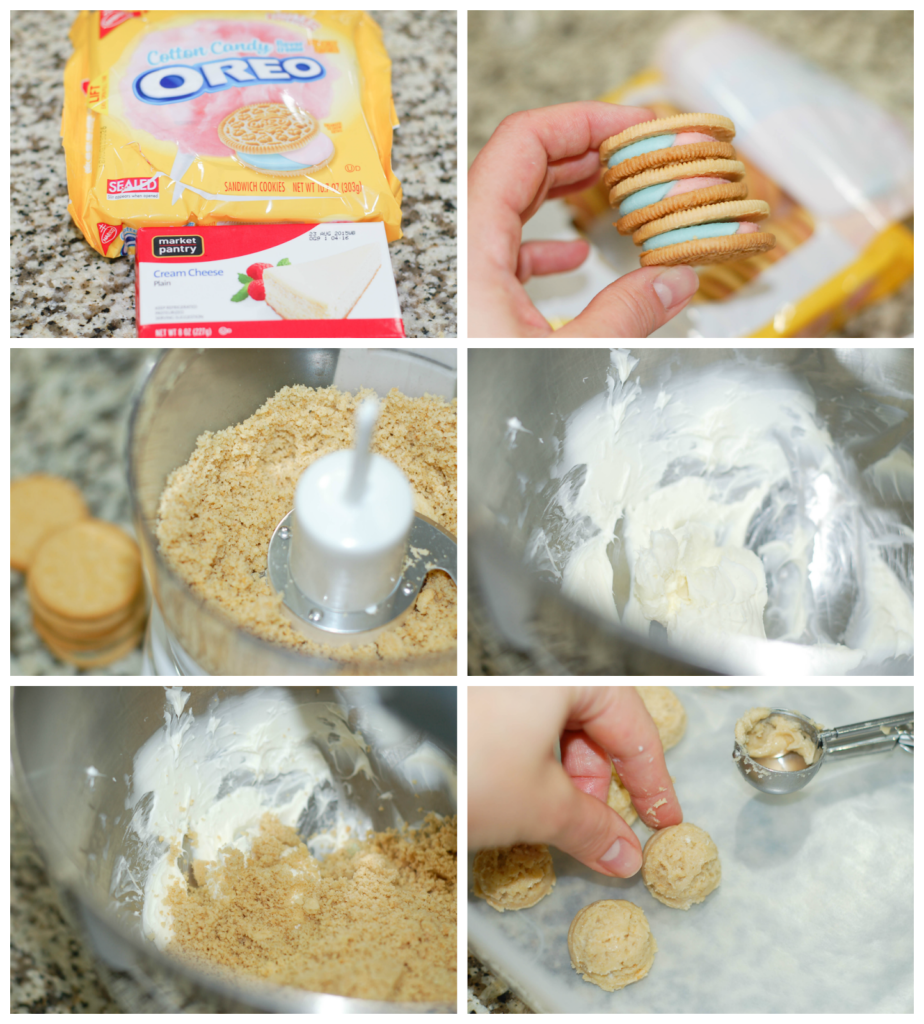
I did not use an entire package of these. I only used 15. You have plenty to taste test before you make the recipe. I used my mini cookie scoop to make the balls. I find it to be the best size for a sweet truffle. I don’t even bother rolling it into balls, I just scoop and drop. Then I pop them in the freezer for a few hours or overnight.
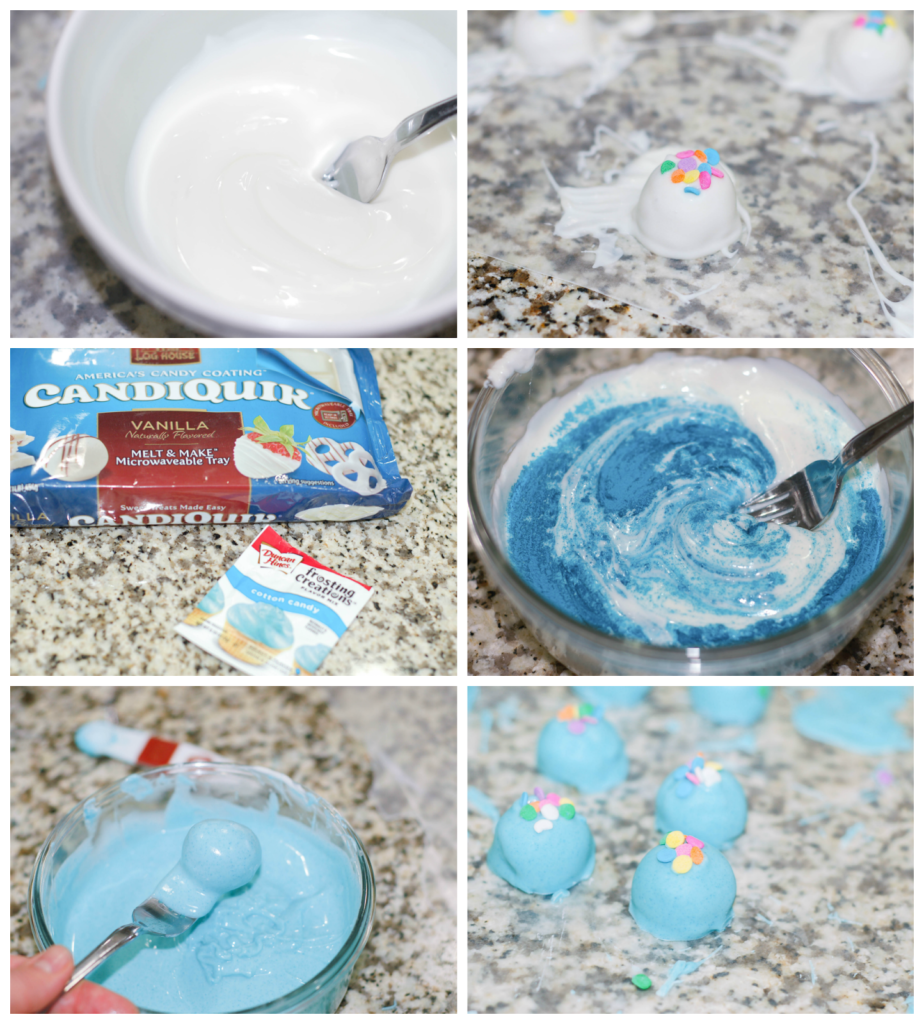
For the coating, I used the vanilla flavored Candiquik candy melt. I dipped half of the Oreo truffles in the regular vanilla flavor. Then I mixed the remaining candy melt with the Cotton Candy flavor of Duncan Hines Frosting Creations mix and dipped the other half of the truffles in it. They came out a pretty blue color.
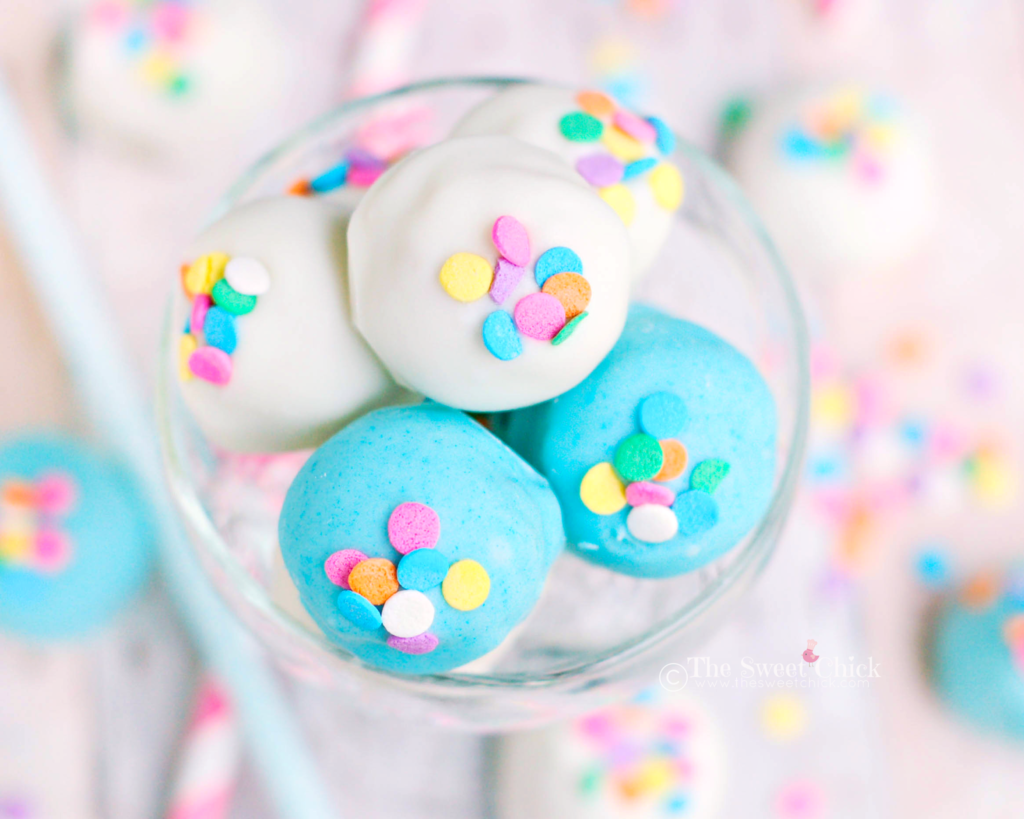
Both flavors of candy melt work well for these truffles, but I think my favorite is the cotton candy flavored one. It just enhances the flavor of the Cotton Candy Oreos.
I took these to the bus stop as usual and handed them out to the kids on my daughter’s bus. They were all excited to try them and there were smiles all around. My son was ready to devour them all himself if I let him.
Cotton Candy Oreo Truffles
by The Sweet Chick
Prep Time: 1.5h w/freezer time
Keywords: no bake freeze snack dessert Cotton Candy Oreos cream cheese candy melt candy coating truffles American spring summer
Ingredients (30 truffles)
For the truffles
- 15 Cotton Candy flavored Oreo cookies
- 4 oz. cream cheese, softened
For the coating
- 1 package (16 oz.) Candiquik candy coating (vanilla/white)
- 1 packet Duncan Hines Frosting Creations Cotton Candy flavor mix
Optional toppings
- sprinkles
Instructions
For the truffles
Crush the Oreo cookies in a food processor until they are a dirt like consistency.
In a medium bowl, mix the crushed Oreos and cream cheese until completely combined.
With a mini scoop, measure out 30 mounds and place them on a wax paper lined air-tight container.
Place the container in the freezer for at least 1 hour to set. (I left mine overnight.)
For the coating
After the balls are set, melt candy coating in the microwave as per directions on package.
Pour in the packet of flavor mix and stir until completely dissolved and combined.
Remove Oreo balls from the freezer. Do a small batch at a time so they don’t fall apart. If you need to, just place them back in the freezer for a few minutes.
Feel free to reshape any balls that are not to your liking by rolling them around in your hand. Just do it quickly not to warm up the dough too much.
Dip the Oreo balls into candy coating mixture until all covered. (I use a fork.) Once covered, remove and softly tap until excess candy melt falls off. Then place the balls on wax paper until the candy melt hardens.
Keep truffles refrigerated until ready to serve.
Optional Toppings
If you are adding sprinkles, add them before the candy coating hardens.
Notes
If you are doing all the truffles with the cotton candy flavor, then use 1 packet of Frosting Creations for all 16 oz. of the candy coating. If you want to do half vanilla and half cotton candy, split the candy coating into two containers before melting and use only half (about 3/4 teaspoon) of the flavor mix powder.
It is best to have the dough as frozen as possible when dipping, so that it doesn’t come apart.
If the bottoms of the truffles don’t get fully covered with candy melt, you can always dip them again.
These truffles can be made ahead of time and refrigerated for 3-4 days.

Related Posts


Subscribe for New Racipies
Get mental health tips, updates, and resources delivered to your inbox.
Rice Krispie Cupcake Pops


Been busy around here with graduations and birthdays. Here is a cute treat I made for my daughter’s class to celebrate her birthday this month. It’s quick, easy, and no bake. Perfect for a summer birthday. And who doesn’t like Rice Krispie treats.

I bought this cute set of cupcake cookie cutters as Walmart, fully intending to bake up some cookies, but I really didn’t want to turn on the oven and heat up the whole kitchen. So I came up with this idea.

You just make a batch of Rice Krispie treats, cut out the cupcake shape and decorate with candy melt. I put mine on popsicle sticks for some extra fun.
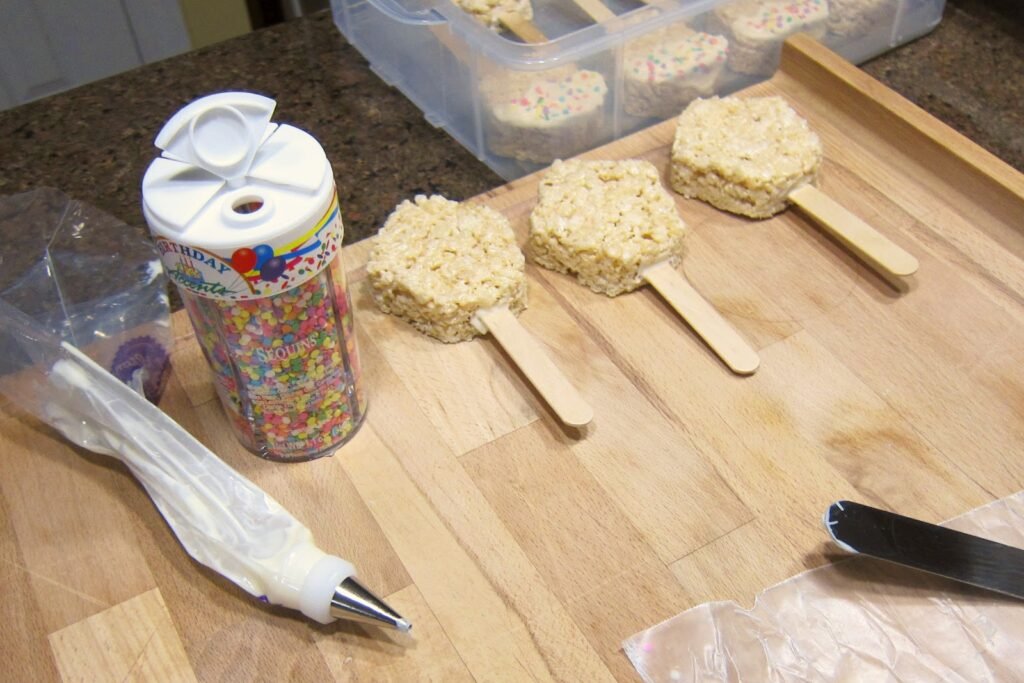
I used Wilton #1 decorating tip to outline and fill in the cupcake design.

I really like how they came out and the kids loved them too.

Rice Krispie Cupcake Pops
by The Sweet Chick
Prep Time: 20-30 minutes
Cook Time: 10 minutes
Keywords: no bake dessert rice krispies birthday Rice Krispie Treats
Ingredients (about 12 cupcake pops)
For Rice Krispie Treats
- 3 tablespoons butter or margarine
- 1 package (10 oz.) regular marshmallows or 4 cups of mini marshmallows
- 6 cups Rice Krispies cereal
For Decorating
- 2 cups white or pink candy melt wafers
- 2 cups light or dark chocolate candy melt wafers
- 1 cup red candy melt wafers
- sprinkles
Also needed
- cupcake cookie cutter
- disposable cake/candy decorating bags
- Wilton cake decorating tip #1 (optional)
- popsicle sticks
Instructions
1. Melt butter over low heat in a large pot. Add marshmallows and stir until completely melted. Remove from heat.
2. Add Rice Krispies cereal. Stir until cereal is all coated with the marshmallow/butter.
3. Using a buttered spatula or wax paper, spread the Rice Krispies mixture onto a wax paper on a flat surface or in a greased jelly roll pan till about a half inch thick.
4. Use your cookie cutter to cut out shapes. You should be able to to yield 12 cupcake shapes. Use every last bit of mixture. Just keep compressing it together to cut out your shapes.
5. Place completed cupcakes into the fridge for 15 minutes to firm up before decorating.
6. Meanwhile melt the white/pink candy wafers one cup at a time in the microwave, preferably in a glass container as per instructions on package. ( I use a glass measuring cup, because it makes it easier to pour the melted candy into the decorating bags later.) Dip the popsicle sticks in the candy melt (only a small dab) and insert in the firmed up Rice Krispie cupcakes.
7. Then pour the remainder of the candy melt into a disposable decorating bags. Using a Wilton #1 cake decorating tip or cutting a very small hole in the tip of the decorating bag, outline the frosting part of the cupcake shape on the top of the Rice Krispie treat, then fill in.
8. Carefully add sprinkles to the white/pink candy melt and place cupcakes back in fridge for 5 minutes to harden the candy melt.
9. Next melt the chocolate candy melt and outline and fill in the bottom half of the cupcake design in the same fashion. While the chocolate candy melt is hardening, prepare your red candy melt and pipe on a small red circle on top of the cupcake design for the cherry.
10. You can store the treats in an air tight container for two days at room temperature or in the fridge for up to five days.
Related Posts
Subscribe for New Racipies
Get mental health tips, updates, and resources delivered to your inbox.