Fresh Fig Tartlets, or Using up the Fridge

Christiana George
Fig Tart lets

How can I put this? These tartlets are prettier than they taste.

There. I said it. Is it horrible for me to admit that? I mean, what kind of food blogger am I if I’m posting only subpar recipes on my blog?

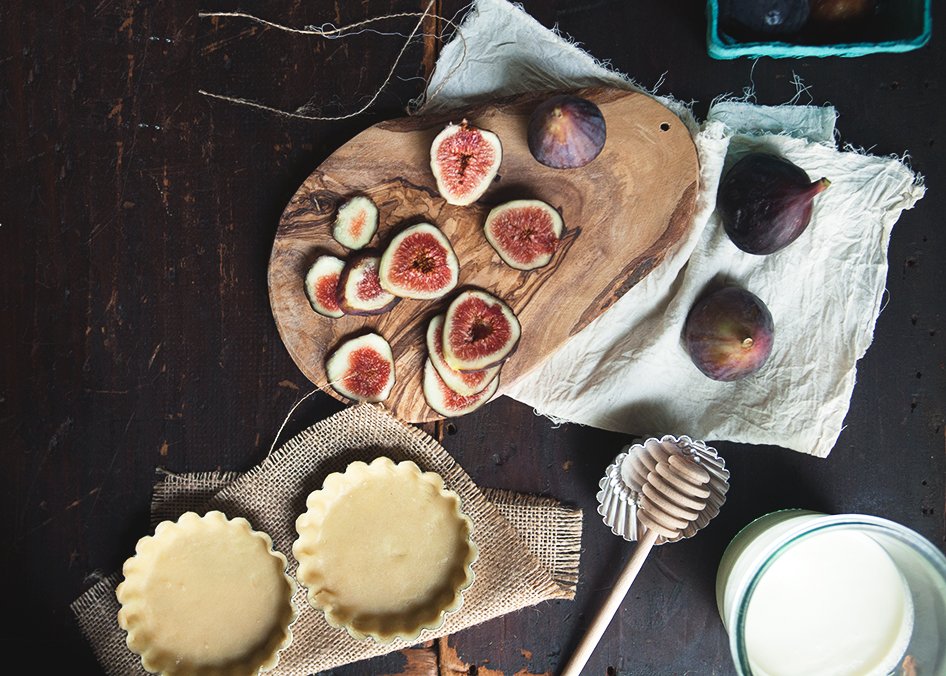
I can’t help it that figs are so goddamn gorgeous!


On the other hand, the filling, goat cheese flavored, was kind of jarring, a little too weird I guess. I like the fig/goat cheese combination, but as a dessert, I’m afraid I cannot endorse the flavors.

So please, pretend I made this instead. I was originally intending to—I love mascarpone in desserts—but there was an open carton of heavy cream, a package of goat cheese, and some leftover sweet tart dough in the fridge that seemed on the verge of expiring. And when it’s My Stomach vs. The Garbage, I’d much rather the former win, wouldn’t you?

I keep hoping that over time, I’ll learn to be a more prudent shopper. The kind who knows what she’s going to cook in the upcoming week. The kind who doesn’t end up tossing moldy bread and vegetables that have turned to mush and strange-smelling leftovers into the garbage. The kind who knows how to jie jue, get rid of. My dad always used to use this phrase whenever there was something that was on the verge of going bad that absolutely had to be eaten. He would make us feel guilty when he sacrificed his stomach for the higher cause of Food Conservation. The guilt didn’t stick, evidently.

I shouldn’t be too hard on myself because I’m not that bad. Has anyone mastered the art of not wasting food, completely and utterly? I dare you to say yes—and then to explain how you do it. Like, what would you do if you had, say, half a can of canned tomatoes and coconut milk that had been sitting around for awhile, a half bag of brownish green beans, a few stalks of withering scallions, a moldy hunk of cheddar, a bagful of sludge-y mixed greens, and about-to-expire whole milk to get rid of?

That’s not hypothetical by the way.

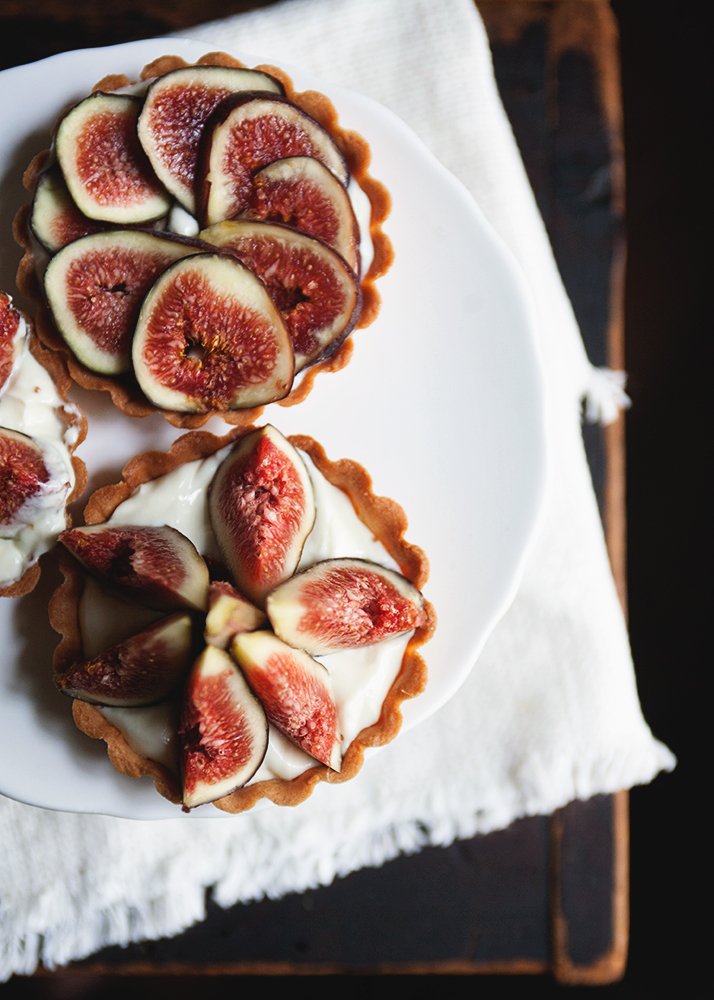
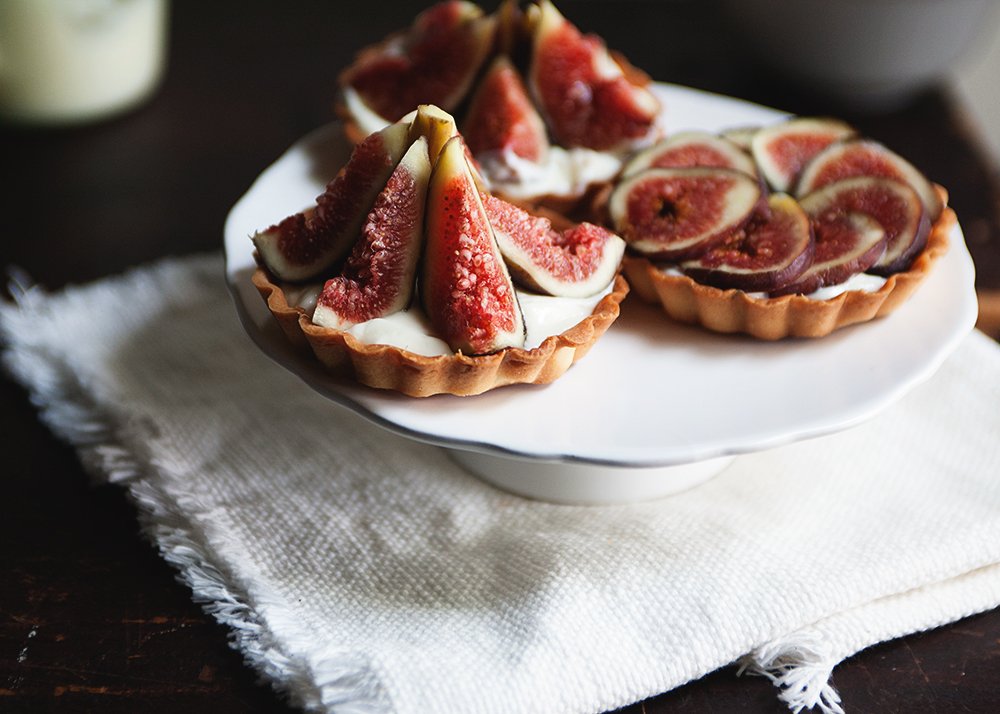
As far as these fig tartlets are concerned, they tasted alright, especially within the first couple hours of the figs being sliced and filling being made. To improve their taste, here’s what I would do: increase the honey by a significant amount until it almost masks the flavor of the goat cheese. (I ran out of honey, go figure.)

Or I would just make the mascarpone filling. But only if you’ve got some around that needs to be used up.


FRESH FIG TARTLETS

Sweet tart dough recipe from Tartine
Makes roughly 6 4-inch tartlets, though you may have leftover filling

Ingredients:

For the tart dough:
1/2 cup + 1 Tbsp unsalted butter, at room temperature
1/2 cup sugar
1/8 tsp salt
1 large egg, room temperature
1-3/4 cups all-purpose flour

For the filling:
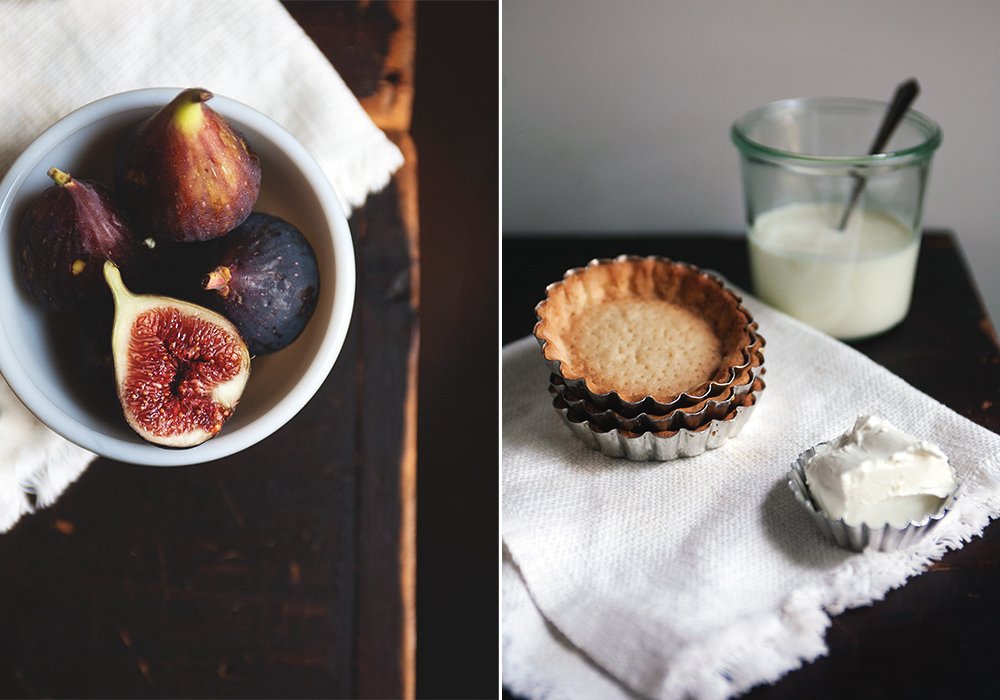
2 cups heavy cream, cold
4 oz. goat cheese, room temperature
1/4 cup honey (I would recommend using more, to taste)
1/2 tsp vanilla extract

8 to 10 fresh figs

Directions:

For the tart dough:

Using a stand mixer, mix on medium speed the butter, sugar, and salt until smooth. Mix in the egg. Stop the mixer and scrape down the sides of the bowl. Add the flour all at once and mix on low speed until just incorporated.

On a lightly floured work surface, divide the dough into 2 equal balls and shape each into a disk of about 1/2 inch thick. Wrap in plastic wrap and chill for at least 2 hours or overnight.

When you’re ready to line a tart pan, on a lightly floured surface, roll out a disk until it’s about 1/8 inch thick. Work quickly so the dough doesn’t become too warm and unworkable. (Refrigerate it for about 10 minutes when this happens.) Cut out a circle larger than the mold, then ease the circle lightly onto the pan. Gently press in the sides, but try not to stretch the dough too much or it’ll shrink during baking. Refrigerate the shell for about 15 minutes until it is firm. (At this point, you can store your dough in the fridge for later use.)


Start preheating your oven at 325 degrees. Dock (make small holes using a fork) the bottom of the tart shell. Bake them in the oven for 10 to 12 minutes until golden brown. Set aside to cool.

For the filling:

In the bowl of a stand mixer outfitted with the whisk attachment, whip the cream to medium stiff peaks. In another bowl, mix the goat cheese, honey, and vanilla and gently fold in the whipped cream.

To assemble:

Spoon the filling into the cooled shell. Slice the figs into sixths and arrange on top of the filling.


New Formula To Support Healthy WEIGHT LOSS

BUY NOW

Subscribe for New Racipies

Get mental health tips, updates, and resources delivered to your inbox.

Candy Coated Oreo M&M;’s

Christiana George

Summer is coming to a close.  Kids are going back to school in two weeks.  Yay!  I love my kids, but I need a break.  The past couple of weeks have been busy.  We drove up north for a week to see family and friends.  It’s was nice to see everyone, but man, that drive is killer.  Then last week I was occupied with making treats and decorations for my son’s birthday.  He loves M&M’s, so I scoured Pinterest for ideas on doing an m&m party.  I found a few things, but these Candy Coated Oreo M&M’s were my idea.  I’ve been wanting to make them for a while, so I thought this was the perfect opportunity.  They came out pretty cute.

I was able to find all the color candy coating I needed at Walmart.  They carry the Wilton, Chocomaker, and Candiquik brands.  I used Birthday Cake Oreos for the center, but you can use regular Oreos.  If you choose to do Double Stuf Oreos, you will need a different mold.

I bought these candy molds at a small culinary shop while I was up north, but they also sell similar ones on Amazon.  They are made for candy coating Oreo shaped cookies.  I bought four sets of molds so by the time I finished the last cookies, the first ones were ready to pop out and I could continue using the mold.


This was my first time trying this.  It was a learn as you go process.  I poured about a tablespoon or so of candy melt into the mold, then pressed an Oreo cookie into the middle and twirled it around to cover the sides.  Then I added candy melt to the top and flattened it out with a spatula.  By the second tray I had figured out not to overfill the cavities.  You have to tap the mold a few times against the counter to get the air pockets out and that also levels out the candy melt. I placed them in the fridge to harden quickly.  You have to work a little to loosen the hardened candy from the mold, but it didn’t take too long. 

For the “M’s”, I bought the Wilton Candy Melts Decorating Tip Set at Walmart.  The writing tip worked perfect.  I printed some “M’s” on my computer and placed the printer paper under a piece of wax paper and traced them the best I could.  You could write directly on the candy coated M&M’s, but I was too scared to mess them up.  When the candy “M’s” had hardened, I attached them to the Oreos with a few dabs of candy coating.

I made these as treats for the party, but they make great party favors also.  You can place them in little bags or boxes and make some cute tags to attach to them.  All the party guests loved them.  

Candy Coated Oreo M&M’s

by The Sweet Chick

Prep Time: 1-1.5 hours

Cook Time: 10-12 minutes


Keywords: microwave dessert snack candy melt birthday cake oreos birthday cookie candy American

Ingredients (48 treats)

For the cookies

For the “M’s”

  • 1 package (16 oz.) Candiquik candy coating, vanilla

Additional items needed

  • 2-4 candy molds for plain cookies
  • Wilton’s Candy Melt Decorating Tips
  • 1 box (12) Wilton’s Disposable Candy Decorating Bags.

Instructions

For the cookies

Using one color at a time, melt candy coating according to instructions on the back of the package. (Usually it’s 30 seconds at a time in the microwave.) I melted a 1 cup at a time. You can always add more if needed. You will not use the entire bag of candy melt. Make sure you candy melt is warm, but not hot before pouring into the mold.


Pour about 1- 1 1/2 tablespoons of candy melt into each cavity of the mold. ( I worked with one mold of 4 at a time). Place one Oreo cookie in the center of each cavity on top of the candy coating. Gently press the cookie down and spin is slowly to coat the sides.

Add a bit more of candy coating on top of the Oreo, careful not to overfill. Spread the candy melt out with a spatula. Then gently tap the mold a few times on a hard surface to release any air bubbles.

Place finished mold(s) in the fridge for 5-10 minutes to speed up the hardening of the candy melt. I continued the same process with another color while the first color was setting. I used 2 molds per color, so it worked out great.

When the candy coating has hardened, remove from fridge and gently wiggle the mold to release the cookie. The flat surface will be the top of the “M&M”.

For the “M’s”

Once all the colors are done, it’s time for the “M’s”. If you are confident about your writing skills, you can write directly on the candy coated cookies. I wasn’t, so I made a template on my computer and printed it out. I placed the template under a piece of wax paper to write my “M’s”. My “M’s” were about an inch tall.

Melt the vanilla candy coating according to the package instructions and pour into a disposable candy decorating bag with writing tip attached.

Trace the “M’s” onto the wax paper over your template. Practice makes perfect.

I placed my template and wax paper on a cookie tray so I could pop it in the fridge for a quick set. I also used a sharp knife to cut off any “tails” that occurred due to run-off candy coating.


Once the “M’s” have set, carefully remove from the wax paper, add a couple of dabs of vanilla candy coating to the backs and place them on your candy coated cookies. Let dry and you are done!


New Formula To Support Healthy WEIGHT LOSS

BUY NOW

Subscribe for New Racipies

Get mental health tips, updates, and resources delivered to your inbox.