
Are Mustard Greens Acidic? Mustard Greens and Acid Reflux

Medically reviewed by Aneeza Pervez Updated Date: January 2, 2026
Introduction to Mustard Greens and Digestive Health
Mustard greens are leafy vegetables belonging to the Brassica family, which includes broccoli, kale, and cabbage. Known for their peppery taste and high nutritional value, mustard greens are a staple in many cuisines around the world. While they are celebrated for their health benefits, individuals with acid reflux or GERD may wonder if mustard greens are acidic and how they affect digestion.
In this article, we’ll examine the acidity of mustard greens, their potential effects on acid reflux, and the best ways to incorporate them into a reflux-friendly diet.
Nutritional Profile of Mustard Greens
Mustard greens are packed with vitamins, minerals, and antioxidants, making them an excellent addition to a healthy diet. Here’s a look at their nutritional benefits in 1 cup (56 grams) of raw mustard greens:
- Calories: 15
- Fiber: 2 grams, supporting gut health.
- Vitamin C: Over 50% of the daily recommended intake, boosting immunity and reducing inflammation.
- Vitamin A: Promotes healthy skin and vision.
- Vitamin K: Essential for bone health and blood clotting.
- Antioxidants: Includes beta-carotene and glucosinolates, compounds that may reduce inflammation and detoxify the body.
Their low calorie count and nutrient density make mustard greens a powerhouse food, but their impact on acid reflux depends on various factors.
Understanding the Acidity of Mustard Greens
Are Mustard Greens Acidic or Alkaline?
Mustard greens are mildly alkaline, with a pH that leans toward neutrality. Their alkaline nature helps balance stomach acid and supports a low-acid diet, making them a suitable choice for individuals with acid reflux or GERD.
Do Mustard Greens Trigger Acid Reflux?
Mustard greens are unlikely to trigger acid reflux for most people. However, their natural spiciness can cause mild irritation in individuals with highly sensitive stomachs or those prone to digestive discomfort. Cooking mustard greens can reduce this spiciness, making them easier to tolerate.
Mustard Greens and Acid Reflux
How Mustard Greens May Help with Acid Reflux?
- Alkaline Nature: Mustard greens can help neutralize stomach acid, alleviating symptoms of acid reflux.
- Rich in Fiber: Fiber promotes smooth digestion and prevents constipation, which can contribute to reflux symptoms.
- Anti-Inflammatory Properties: Antioxidants in mustard greens reduce inflammation in the digestive tract, soothing irritation caused by acid reflux.
Potential Concerns with Mustard Greens
- Spiciness: The natural peppery flavor of mustard greens may irritate some people with severe acid reflux. Cooking them or combining them with mild foods can help mitigate this effect.
- Excessive Fiber: For individuals with sensitive stomachs, consuming large amounts of mustard greens may cause bloating or gas, which can worsen reflux symptoms.
How to Safely Include Mustard Greens in a GERD-Friendly Diet?
To enjoy mustard greens without triggering acid reflux, consider these tips:
Cooked vs. Raw Mustard Greens
Cooking mustard greens reduces their natural spiciness and softens their fibers, making them gentler on the stomach. Steaming, sautéing, or boiling are ideal methods for preparing them in a reflux-friendly way.
Pair with Non-Acidic Foods
Combine mustard greens with alkaline or neutral foods like quinoa, sweet potatoes, or lean proteins to create balanced meals that are easy on the stomach.
Portion Control
Stick to moderate servings (about 1 cup of cooked mustard greens) to avoid overwhelming your digestive system with too much fiber or spiciness.
Avoid Spicy Seasonings
Skip heavy spices, vinegar-based dressings, or acidic sauces when preparing mustard greens. Instead, use mild seasonings like olive oil, garlic, or a pinch of salt.
Author Tip: 7 Kinds of Foods to Avoid with GERD
Delicious and GERD-Friendly Mustard Greens Recipes
Steamed Mustard Greens with Lemon Olive Oil
- Ingredients: Mustard greens, olive oil, and a light squeeze of lemon (optional).
- Preparation: Steam mustard greens until tender and drizzle with olive oil. For those with acid sensitivity, skip the lemon.
Mustard Greens and Sweet Potato Mash
- Ingredients: Cooked mustard greens and mashed sweet potatoes.
- Preparation: Sauté mustard greens with a splash of olive oil and serve over creamy mashed sweet potatoes.
Mustard Greens Soup
- Ingredients: Cooked mustard greens, vegetable broth, and diced carrots.
- Preparation: Blend ingredients into a smooth, warming soup that’s gentle on the digestive system.
Health Benefits of Mustard Greens Beyond Acid Reflux
Mustard greens offer numerous health benefits that extend beyond their role in managing acid reflux:
- Supports Heart Health: Rich in potassium and antioxidants, mustard greens promote healthy blood pressure and cardiovascular function.
- Boosts Immunity: High levels of vitamin C and other antioxidants strengthen the immune system.
- Detoxifies the Body: Glucosinolates in mustard greens aid liver function and help eliminate toxins.
- Promotes Bone Health: Vitamin K is essential for maintaining strong bones and preventing osteoporosis.
Tips for Managing Acid Reflux
In addition to incorporating mustard greens into your diet, these strategies can help manage acid reflux:
- Eat Smaller Meals: Large meals can increase pressure on the stomach, worsening reflux symptoms.
- Avoid Known Triggers: Stay away from spicy, fried, or highly acidic foods like citrus, tomatoes, and caffeine.
- Stay Upright After Eating: Wait at least 2–3 hours before lying down to prevent acid from flowing back into the esophagus.
- Elevate Your Head While Sleeping: Use a wedge pillow or raise the head of your bed to reduce nighttime reflux.
- Stay Hydrated: Drinking water throughout the day supports digestion, but avoid drinking large amounts during meals to prevent bloating.
Author Tip: 7-Day Meal Plan For Gastritis
Conclusion
Mustard greens are mildly alkaline, nutrient-rich vegetables that can be safely enjoyed by individuals with acid reflux when consumed mindfully. Their fiber content, anti-inflammatory properties, and alkaline nature make them a valuable addition to a reflux-friendly diet. By cooking mustard greens and pairing them with gentle, non-acidic foods, you can reap their health benefits without triggering discomfort.
FAQs
Are mustard greens acidic or alkaline?
Mustard greens are mildly alkaline, making them suitable for a low-acid diet.
Can mustard greens trigger acid reflux?
Raw mustard greens might irritate sensitive stomachs due to their spiciness, but cooked mustard greens are generally safe.
Should I eat raw or cooked mustard greens for acid reflux?
Cooked mustard greens are easier to digest and less likely to cause reflux symptoms compared to raw greens.
How much mustard greens can I eat with GERD?
Stick to moderate servings, around 1 cup of cooked mustard greens, to avoid digestive discomfort.
Can mustard greens be included in a low-acid diet?
Yes, their alkaline nature and health benefits make them an excellent addition to a low-acid diet.
Related Posts


Subscribe for New Racipies
Get mental health tips, updates, and resources delivered to your inbox.
Biscoff Cookie Dough Pops


Do you buy your mother flowers on Mother’s Day? Well, how about making some instead. These Biscoff Cookie Dough Pops are perfect for a special occasion and a special person. Kids can also get in on the action, if they don’t eat all the cookie dough first. It is pretty irresistible. If you like Biscoff Cookie Spread, you are going to love Biscoff Cookie Dough. It’s a wonderful combination of Biscoff flavor and raw chocolate chip cookie dough (don’t worry, no eggs involved). You’ve gotta try it!

Even if you don’t want to make the flower pops, you can still make regular round pops or truffles with this cookie dough recipe. I think I like it even more than the plain cookie dough recipe I used for my Cookie Dough Bunny Truffles. I use Wilton’s meringue powder as my egg replacer, so these are egg free and totally edible raw.

The dough is not heavy. It doesn’t feel a ton of bricks. It light, fluffy and oh so good. You get the flavor of Biscoff, but less sweet. I love to bake with Biscoff, but by itself it’s sometimes a little too sweet. In this recipe I substituted some of the sugars for Biscoff so the sweetness is reduced. You could just grab a spoon and eat the whole bowl while watching tv or you can make some pretty flower pops like I did.

I bought these silicone lollipop molds at Walmart during the Easter season. Each pack came with 2 mold of 6 pops each with space to add a lollipop sticks which were included. I don’t make candy lollipops, but I knew I could use it to make cookie dough pops.
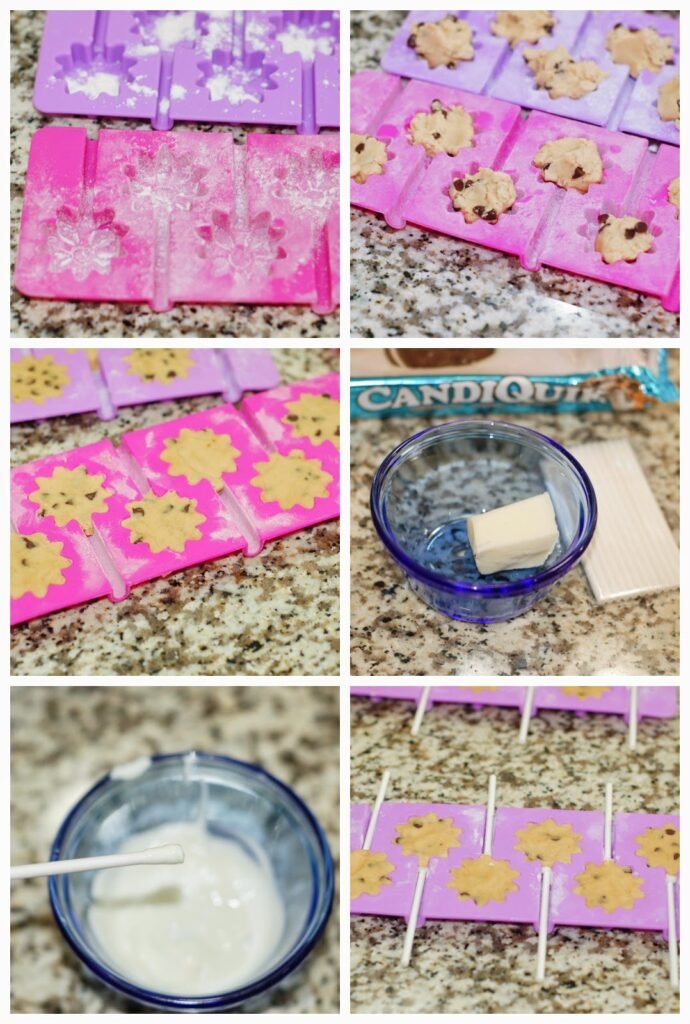
I just sprinkled some flour into the molds and shook out any excess. Then took a bit of dough and started pressing it into the molds until it was flush. To add the sticks, I first dipped them in some melted candy coating and then pushed them into place while placing my hand over the dough so the stick would go in straight. After that, it was time to pop them in the freezer. The first batch I left in there 4 hours because I was busy with other stuff, but the Bunny Truffles I had only placed in the freezer for a 1/2 hour and they were firm enough to remove from the mold. I all depends on how cold your freezer is.

You have to stretch and tug the silicone to loosen the pops. They came out great. Then it was time for dipping and decorating. You have to bring out only a few at a time from the freezer so the dough stays firm. My kitchen was very hot yesterday, so I had to be careful because once the dough softened up too much it fell off the stick. Also make sure your candy melt is not too hot.
These are the three colors I used, but there are lots of different colors available. I also added some colored sugar crystals which I had in the pantry, to some of the pops. You add the crystals before the candy melt fully sets. Once the candy melt was set, I used a disposable candy decorating bag to pipe on the centers. Usually the candy melt sets fast, but like I said my kitchen was a little warm yesterday so I ended up having to place all my pops in the fridge to get the coating to harden. The weather here has been brutal this week. I also though of using pastel M&Ms for the centers, but I didn’t have any on hand.

To give the flower pops a little more special treatment I placed them in cupcake. You can make any cupcakes you want and add some green frosting, then tint some coconut flakes with some green dye to make it look like grass and adhere them to the frosting. Just place the coconut flakes in a Ziplock bag, add some food coloring and shake it up. This is something the kids can do. Or if you want you can just make the pops and maybe add a cute paper leaf to the lollipop stick with a message. Whatever you do, enjoy your pops and make sure to share!
Biscoff Cookie Dough Pops
by The Sweet Chick
Prep Time: 2 hours
Keywords: no bake biscoff chocolate chips candy melt Mother’s Day pops truffles American spring
Ingredients (52 pops)
For the cookie dough
- 2/3 cup unsalted butter, room temperature
- 2 tablespoons brown sugar
- 1/4 cup granulated sugar
- 1/4 cup Biscoff cookie spread
- 1/2 teaspoon vanilla extract/paste
- 2 teaspoons meringue powder ( I used Wilton’s)
- 2 tablespoons water
- 1 3/4 cups all purpose flour
- 1/2 teaspoon baking soda
- 1/2 teaspoon salt
- 1/2 cup mini chocolate chips
For the candy coating
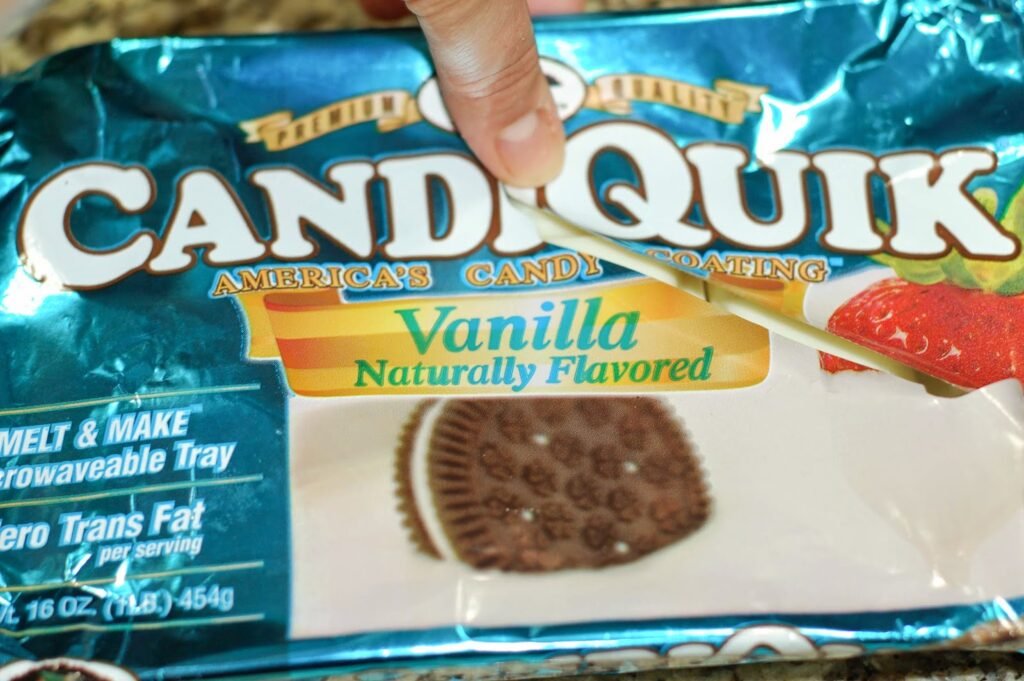
- 1 package (16 oz.) Candiquik Vanilla candy coating (white)
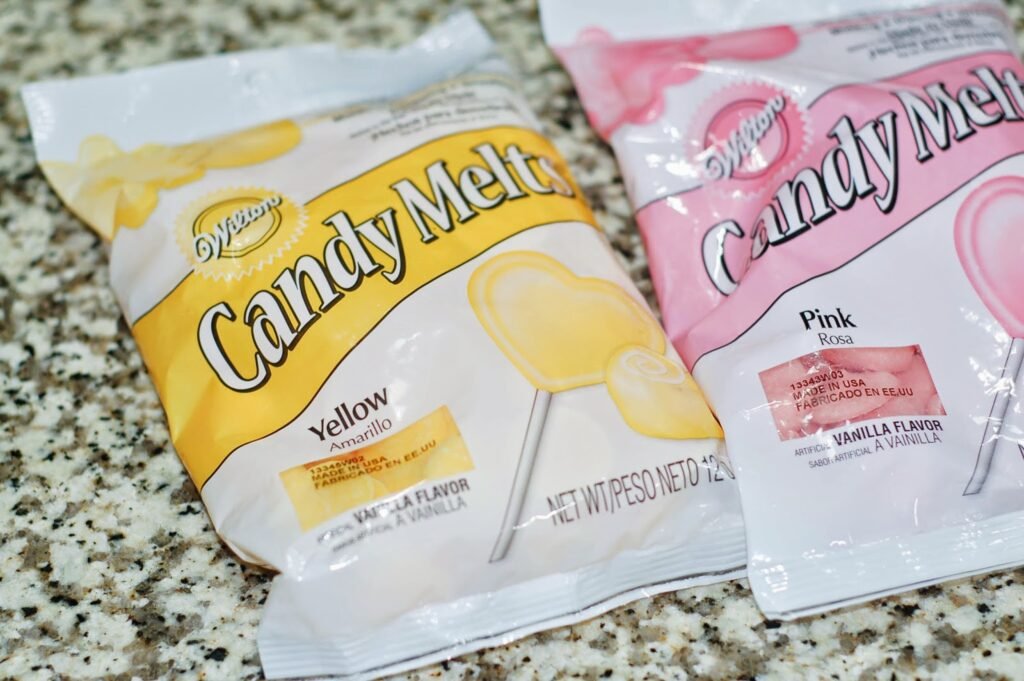
- 1 package (12 oz.) Wilton’s Candy Melt wafers (pink)
- 1 package (12 oz.) Wilton’s Candy Melt wafers (yellow)
Tools needed
- silicone flower pop mold
- 52 lollipop sticks
- 1 box (12) Wilton’s disposable candy decorating bags
Optional toppings
- pink, white, and yellow sugar crystals
Instructions
For the cookie dough
In a stand mixer, cream together the butter and sugars. Then add the cookie spread and vanilla, mix on low until well blended.
In a small bowl mix together the meringue powder and water, then add it to the mixer bowl and mix well.
In a medium bowl combine the flour, baking soda, and salt. Next add it to the mixer bowl a little at a time while mixing on low until dough starts to form.
Last, add the chocolate chips and mix until all incorporated.
Lightly dust your silicone molds with flour, removing any excess.
Add a small amount of cookie dough to each cavity pressing down with your fingers until cavity is full, and making sure the top of the dough is flush to the mold.
Place a Candiquik square in a small microwave safe bowl, and melt in the microwave according to instructions on the package (usually 30 second at a time until fully melted).
Dip the tips of the lollipop sticks into the candy melt, then carefully insert them into the bottoms of the flower. (I place my hand on top of the cookie dough while inserting the sticks to insure they would go in correctly.)
Place the molds in the freezer for 1/2 hour to 1 hour until they are firm enough to pop out of the mold. (I placed the pops in an airtight container and kept them in the freezer until it was time to dip them in the candy melt.)
For the candy coating
Using one color at a time, melt your candy coating in the microwave according to instructions on the package. Make sure your candy coating is not too hot, just warm. (If your candy coating is not smooth, you can add a little bit of vegetable shortening to it, 1/2 teaspoon at a time.)
Remove a small batch of cookie dough pops from the freezer and dip them in the candy melt. Swirl them around upside down a bit to remove any excess candy melt, then place them upright in a pop holder until the candy melt hardens. (I had to place mine in the fridge because my kitchen was a bit too warm that day.)
Repeat process for all pops, using the different colored candy coating.
For the centers of the flower pops, pour melted candy coating into a disposable candy decorating bag with tip cut off and add a small dot of candy coating in the middle. Make sure you candy coating is not too hot, wait for it to be just warm. It will make piping easier and will save you from burning your hands. (If your candy coating hardens up in the bag, just pop it back in the microwave for about 10 seconds or so.)
Once all the candy melt has set, you really don’t need to keep these pops refrigerated. Remember there are not eggs involved. Just keep them in an airtight container.
Optional toppings
If you are using sugar crystals, sprinkle them on before candy melt is completely set.
Enjoy!
Cookie dough recipe adapted from Chocolate Chip Cookie Dough Cake Pops by My Little Cupcake Blog
This recipe may be shared at these fabulous link parties.
Related Posts


Subscribe for New Racipies
Get mental health tips, updates, and resources delivered to your inbox.