
Are Turnip Greens Acidic? Turnip Greens and Acid Reflux

Medically reviewed by Aneeza Pervez Updated Date: January 2, 2026

Turnip greens, the leafy tops of the turnip root vegetable, are often praised for their impressive nutritional benefits and versatility in cooking. Packed with vitamins, minerals, and antioxidants, they’re a popular choice in healthy diets. However, if you suffer from acid reflux or GERD (gastroesophageal reflux disease), you might wonder: “Are turnip greens acidic, and are they safe for acid reflux?”
The good news is that turnip greens are not acidic. With a pH level that ranges between 6.0 and 6.5, turnip greens are considered mildly alkaline. Their alkalizing properties, combined with their high fiber content and anti-inflammatory nutrients, make them an excellent choice for managing acid reflux. Incorporating turnip greens into your meals can soothe digestion and reduce the risk of reflux symptoms.
In this article, we’ll explore the acidity of turnip greens, their nutritional profile, and how they can help individuals with acid reflux. Plus, we’ll share tips and recipes for including turnip greens in a reflux-friendly diet.
Are Turnip Greens Acidic or Alkaline?
Turnip greens are alkaline in nature, with a pH level that leans toward neutral or mildly alkaline, typically ranging from 6.0 to 6.5. This low acidity makes them a reflux-friendly food that can help balance stomach acid levels and reduce irritation to the esophagus.
Unlike highly acidic foods like citrus fruits, tomatoes, or vinegar, turnip greens do not stimulate excessive acid production in the stomach. Instead, they help neutralize stomach acid and create an environment that is less likely to trigger reflux symptoms.
Also Read: Are Zucchini Safe for Acid Reflux?
Nutritional Profile of Turnip Greens
Turnip greens are a nutritional powerhouse, offering a wide range of vitamins, minerals, and antioxidants that benefit overall health and digestion. Here’s what makes turnip greens so special:
1. High in Fiber
- One cup of cooked turnip greens provides about 5 grams of dietary fiber, which supports healthy digestion and prevents constipation. Fiber helps regulate bowel movements and reduces bloating, both of which are key factors in managing acid reflux.
2. Rich in Vitamins
- Vitamin K: Essential for blood clotting and bone health.
- Vitamin A: Supports immune function and gut health.
- Vitamin C: A powerful antioxidant that reduces inflammation and promotes tissue healing.
3. Loaded with Minerals
- Calcium: Promotes strong bones and supports proper muscle function, including the muscles of the digestive system.
- Magnesium: Helps relax the lower esophageal sphincter (LES) and reduce reflux episodes.
- Potassium: Maintains electrolyte balance and supports proper digestion.
4. Low in Calories and Fat
- Turnip greens are a low-calorie food, with only 30 calories per cup of cooked greens, and are virtually fat-free, making them an ideal choice for weight management and acid reflux control.
5. High in Antioxidants
- Turnip greens contain antioxidants like lutein, beta-carotene, and quercetin, which reduce inflammation and protect the esophagus from damage caused by stomach acid.
Related to Read: 7 Kinds of Foods to Avoid with GERD
Benefits of Turnip Greens for Acid Reflux
Research suggest that turnip greens offer numerous benefits for individuals managing acid reflux or GERD. Here’s how they can help:
1. Neutralize Stomach Acid
- The mildly alkaline nature of turnip greens helps balance stomach acid levels, reducing the likelihood of acid reflux symptoms.
2. Promote Healthy Digestion
- The fiber in turnip greens improves digestion by regulating bowel movements and preventing overeating, a common trigger for acid reflux.
3. Reduce Inflammation
- Turnip greens’ antioxidants and anti-inflammatory compounds can soothe irritation in the esophagus caused by stomach acid.
4. Support the Lower Esophageal Sphincter (LES)
- Minerals like magnesium and potassium support the proper functioning of the LES, preventing stomach acid from flowing back into the esophagus.
5. Aid in Weight Management
- Excess weight is a major risk factor for acid reflux. Turnip greens are low in calories and high in fiber, making them a filling and weight-friendly option.
Tips for Including Turnip Greens in a GERD-Friendly Diet
To get the most out of turnip greens without triggering reflux symptoms, follow these tips:
1. Avoid High-Fat Cooking Methods
- Steer clear of frying or adding heavy cream-based sauces, as high-fat meals can relax the LES and trigger reflux. Opt for steaming, boiling, or sautéing with a small amount of olive oil.
2. Pair with Reflux-Friendly Foods
- Combine turnip greens with other non-acidic, alkaline foods like brown rice, quinoa, zucchini, or lean proteins like chicken or turkey.
3. Limit Spices
- Avoid adding spicy seasonings like chili powder or cayenne pepper, which can irritate the stomach. Use mild herbs like parsley, basil, or dill instead.
4. Eat in Moderation
- Even reflux-friendly foods can cause discomfort if eaten in large quantities. Stick to moderate portions of turnip greens to avoid overeating.
Author Tip: 7-Day Meal Plan For Gastritis
Reflux-Friendly Turnip Greens Recipes
1. Sautéed Turnip Greens with Garlic
Ingredients:
- 1 bunch turnip greens, washed and chopped
- 1 tablespoon olive oil
- 1 clove garlic, minced (optional, if tolerated)
- A pinch of salt
Instructions:
- Heat olive oil in a pan over medium heat.
- Add garlic (if tolerated) and sauté for 1 minute.
- Add turnip greens and cook until wilted, about 5–7 minutes.
- Season with salt and serve as a side dish.
2. Turnip Greens and Quinoa Bowl
Ingredients:
- 1 cup cooked quinoa
- 1 cup steamed turnip greens
- 1 tablespoon olive oil
- 1/4 cup diced cucumber
Instructions:
- Combine cooked quinoa, steamed turnip greens, and diced cucumber in a bowl.
- Drizzle with olive oil and toss to combine.
- Serve warm or chilled.
3. Turnip Greens Soup
Ingredients:
- 2 cups chopped turnip greens
- 3 cups low-sodium vegetable broth
- 1/2 cup diced carrots
- 1/2 cup diced celery
Instructions:
- In a pot, bring vegetable broth to a boil.
- Add carrots, celery, and turnip greens.
- Simmer for 20 minutes until vegetables are tender.
- Serve warm with a slice of whole-grain bread.
Frequently Asked Questions About Turnip Greens and Acid Reflux
1. Are turnip greens good for acid reflux?
Yes, turnip greens are mildly alkaline and high in fiber, making them a safe and beneficial choice for acid reflux sufferers.
2. Can turnip greens trigger acid reflux?
Turnip greens are unlikely to trigger reflux. However, pairing them with high-fat or spicy ingredients may aggravate symptoms.
3. Should I eat turnip greens raw or cooked for acid reflux?
Both raw and cooked turnip greens are safe for acid reflux. Cooking them by steaming or sautéing can make them easier to digest.
4. What are other reflux-friendly leafy greens?
In addition to turnip greens, other reflux-friendly leafy greens include spinach, kale, collard greens, and Swiss chard.
5. How often can I eat turnip greens?
You can include turnip greens in your diet several times a week, as long as they are prepared in reflux-friendly ways and consumed in moderate portions.
Final Thoughts
Turnip greens are a nutrient-rich, low-acid vegetable that is safe and beneficial for individuals with acid reflux or GERD. Their high fiber content, alkalizing properties, and anti-inflammatory nutrients make them an excellent addition to a reflux-friendly diet.
Whether sautéed, steamed, or added to soups, turnip greens can be prepared in a variety of ways to support digestion and reduce reflux symptoms. As always, listen to your body and adjust your portion sizes and preparation methods to suit your individual tolerance.
Gluco6 Reviews
ProstaVive Reviews
Mitolyn Reviews
Nagano Tonic Reviews
Nerve Fresh
Lipozem Reviews
Sugar defender
CelluCare Reviews
Nitric Boost Ultra Reviews
Pineal XT Reviews
Related Posts


Subscribe for New Racipies
Get mental health tips, updates, and resources delivered to your inbox.
Cherry Cordial Brownie Cookies


Yet another rainy day. Kinda dreary. I don’t really feel like doing anything. I may just sit in front of the TV and eat the rest of these cookies I made yesterday. I used the Cherry Cordial M&M’s that were out during the Christmas season. They taste exactly like the Cherry M&M’s I used last year to make my Dark Chocolate Cherry M&M Cookies. Although I haven’t look for the Cherry ones this year, I know they are usually out for Valentine’s day. So either one you use is good. But you gotta have the cherry flavor in there.

When I was scouring the web for a soft, chewy chocolate cookie recipe to use with these Cherry Cordial M&M’s, I came upon this recipe for Soft and Chewy Brownie Cookies from Averie Cooks. Averie has some fabulous cookie recipes and her food photography always leaves me drooling.
Now I know she says not to use chocolate chips in this recipe because they do not melt well in the microwave, but I used Ghirardelli Baking Chips which I already know melt very well in the microwave. And they taste amazing. Since I needed 12 oz. of chocolate and the baking chips come in a 10 oz. bag, I added some mini chocolate chips to make up the difference and bridge the way between the dark chocolate baking chips and the milk chocolate M&M’s. What intrigued me about this recipe besides the minimal amount of flour, was the fact that you need to leave the batter out at room temperature for 1-2 hours prior to baking. I though this was odd. Usually you put it in the fridge. But, hey, I am always up for something new. I left the covered batter out for about 1 1/2 hours to set.

The result is a batter that has the consistency of a very thick mousse. If it hadn’t been for the raw eggs, I would have stuck me head in the bowl and devoured the batter raw. It’s unlike any batter I have worked with before. I did take a tiny taste and it was INCREDIBLE! I couldn’t wait to bake it. You can just scoop it onto a cookie sheet and gently press in the M&M’s. I choose to make them into heart shapes. I drop an almost full large scoop of the dough into each cavity of my Wilton Heart Shaped Whoopie Pie Pan. The same one I used for my Sugar Cookie Rice Krispie Treats. The round shaped whoopie pie pan works just as well. I just flattened out the dough with a spatula to fit the shape and gently pressed in the Cherry Cordial M&M’s

You have to let the cookies cool completely before trying to remove them from the pan or they will fall apart on you (and you will have to eat them). I think I may have overfilled my pan a bit, but they still came out heart shaped. I tasted one while is was still warm and the gooey chocolate was to die for.
Once cooled, the cookies have a slightly crispy outside with a soft, chewy inside just like a brownie. Since I used the baking chips which are larger than regular chocolate chips, you also get some nice chunks of dark chocolate when you bite into the cookie. The Cherry Cordial M&M’s just heighten the chocolate experience. I may try just mixing them right in the batter next time to add even more cherry flavor.

I have never made brownies from scratch before, never mind brownie cookies. I am so excited they came out right. I hope you enjoy them as much as I do.
Cherry Cordial Brownie Cookies

by The Sweet Chick
Prep Time: 15 minutes
Cook Time: 10 minutes
Keywords: bake dessert snack dark chocolate Cherry Cordial M&M’s brownies cookie American
Ingredients (15 cookies)
- 1 bag (10 oz.) Ghirardelli 60% Cacao Bittersweet Chocolate baking chips, divided
- 3 tablespoons butter
- 2 large eggs
- 2/3 cup sugar
- 1 teaspoon vanilla extract
- 1/4 cup all purpose flour
- 1/4 teaspoon baking powder
- 1/4 cup mini chocolate chips
- 1 bag (9.90 oz.) Cherry Cordial or Cherry M&M’s
Instructions
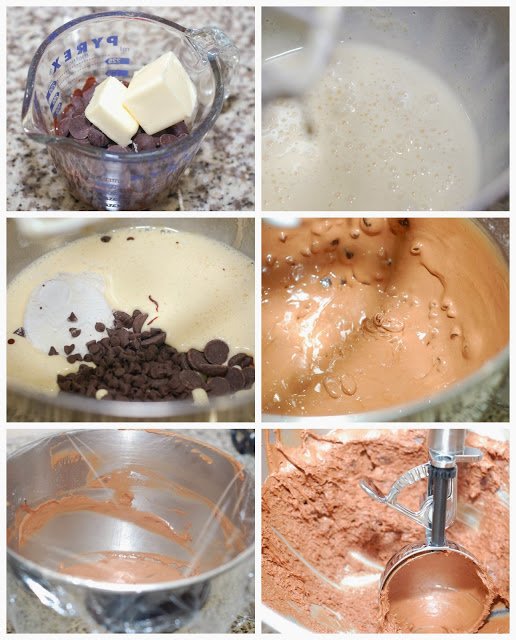
Place 5 oz. of the Ghirardelli baking chips in a small microwave safe bowl or measuring cup with the butter. Microwave at 30 second intervals until completely melted and smooth when stirred. Set aside to cool.
In a stand mixer add eggs, sugar and vanilla. Mix on medium for about 8 minutes or until mixture is a pale, creamy texture.
Add the flour, baking powder, melted chocolate, remaining 5 oz. of baking chips, and the mini chocolate chips to the egg mixture. Mix on medium for about 1 minute until fully combined.
Remove bowl from mixer, cover with plastic wrap and set aside at room temperature for about 1 hour until set. (The consistency should be that of a very thick mousse after set.)
Once mixture is set, preheat oven to 350°F.
With a large scoop (a little less than full), fill each cavity of the whoopie pie pan. With a spatula, spread the batter out to fill the shape of the cavity.
Gently press 3-5 M&M’s into each shape.
Bake for 10 minutes each batch. Do not remove from pan. Leave in pan until completely cooled, then gently remove with a clean spatula.
Grab yourself a cup of coffee or milk and sit down with your cookie. You are going to want to savor each minute of this dark chocolate and cherry bliss!
This post may be shared at these fabulous link parties.
Related Posts


Subscribe for New Racipies
Get mental health tips, updates, and resources delivered to your inbox.