
Biscoff Cookie Dough Pops

Medically reviewed by Christiana George Updated Date: December 19, 2022


Do you buy your mother flowers on Mother’s Day? Well, how about making some instead. These Biscoff Cookie Dough Pops are perfect for a special occasion and a special person. Kids can also get in on the action, if they don’t eat all the cookie dough first. It is pretty irresistible. If you like Biscoff Cookie Spread, you are going to love Biscoff Cookie Dough. It’s a wonderful combination of Biscoff flavor and raw chocolate chip cookie dough (don’t worry, no eggs involved). You’ve gotta try it!

Even if you don’t want to make the flower pops, you can still make regular round pops or truffles with this cookie dough recipe. I think I like it even more than the plain cookie dough recipe I used for my Cookie Dough Bunny Truffles. I use Wilton’s meringue powder as my egg replacer, so these are egg free and totally edible raw.

The dough is not heavy. It doesn’t feel a ton of bricks. It light, fluffy and oh so good. You get the flavor of Biscoff, but less sweet. I love to bake with Biscoff, but by itself it’s sometimes a little too sweet. In this recipe I substituted some of the sugars for Biscoff so the sweetness is reduced. You could just grab a spoon and eat the whole bowl while watching tv or you can make some pretty flower pops like I did.

I bought these silicone lollipop molds at Walmart during the Easter season. Each pack came with 2 mold of 6 pops each with space to add a lollipop sticks which were included. I don’t make candy lollipops, but I knew I could use it to make cookie dough pops.
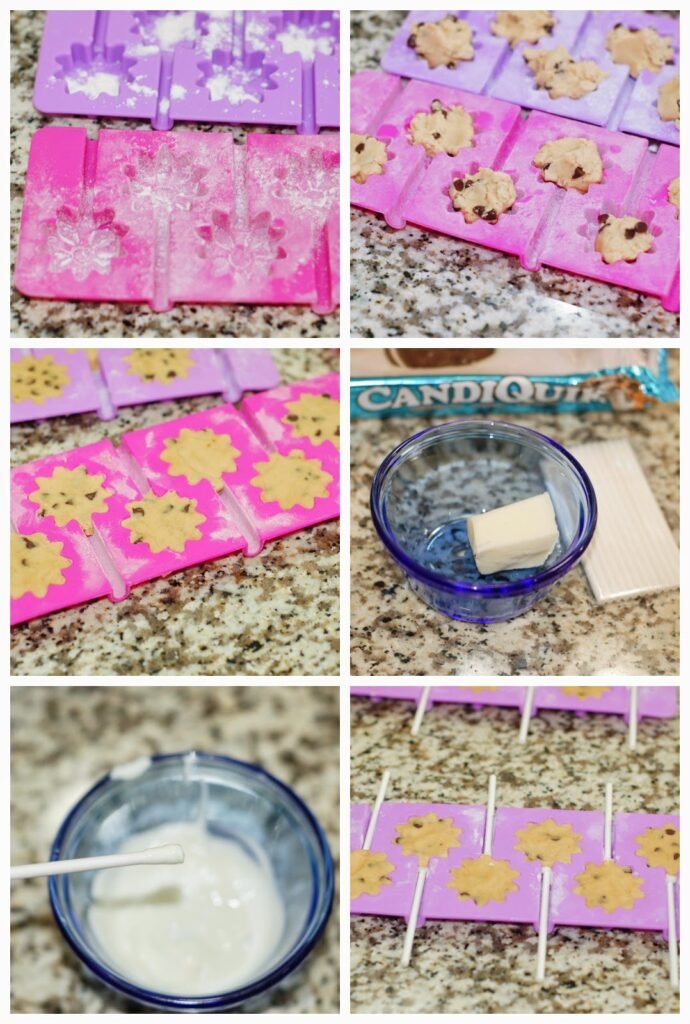
I just sprinkled some flour into the molds and shook out any excess. Then took a bit of dough and started pressing it into the molds until it was flush. To add the sticks, I first dipped them in some melted candy coating and then pushed them into place while placing my hand over the dough so the stick would go in straight. After that, it was time to pop them in the freezer. The first batch I left in there 4 hours because I was busy with other stuff, but the Bunny Truffles I had only placed in the freezer for a 1/2 hour and they were firm enough to remove from the mold. I all depends on how cold your freezer is.

You have to stretch and tug the silicone to loosen the pops. They came out great. Then it was time for dipping and decorating. You have to bring out only a few at a time from the freezer so the dough stays firm. My kitchen was very hot yesterday, so I had to be careful because once the dough softened up too much it fell off the stick. Also make sure your candy melt is not too hot.
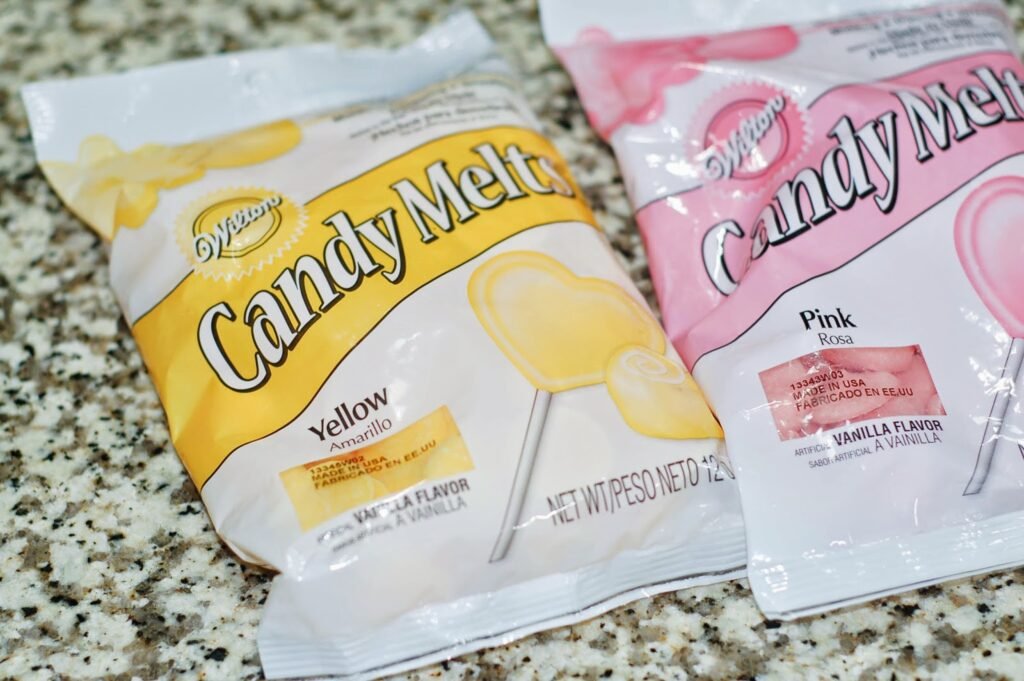
These are the three colors I used, but there are lots of different colors available. I also added some colored sugar crystals which I had in the pantry, to some of the pops. You add the crystals before the candy melt fully sets. Once the candy melt was set, I used a disposable candy decorating bag to pipe on the centers. Usually the candy melt sets fast, but like I said my kitchen was a little warm yesterday so I ended up having to place all my pops in the fridge to get the coating to harden. The weather here has been brutal this week. I also though of using pastel M&Ms for the centers, but I didn’t have any on hand.
To give the flower pops a little more special treatment I placed them in cupcake. You can make any cupcakes you want and add some green frosting, then tint some coconut flakes with some green dye to make it look like grass and adhere them to the frosting. Just place the coconut flakes in a Ziplock bag, add some food coloring and shake it up. This is something the kids can do. Or if you want you can just make the pops and maybe add a cute paper leaf to the lollipop stick with a message. Whatever you do, enjoy your pops and make sure to share!
Biscoff Cookie Dough Pops
by The Sweet Chick
Prep Time: 2 hours
Keywords: no bake biscoff chocolate chips candy melt Mother’s Day pops truffles American spring
Ingredients (52 pops)
For the cookie dough
- 2/3 cup unsalted butter, room temperature
- 2 tablespoons brown sugar
- 1/4 cup granulated sugar
- 1/4 cup Biscoff cookie spread
- 1/2 teaspoon vanilla extract/paste
- 2 teaspoons meringue powder ( I used Wilton’s)
- 2 tablespoons water
- 1 3/4 cups all purpose flour
- 1/2 teaspoon baking soda
- 1/2 teaspoon salt
- 1/2 cup mini chocolate chips
For the candy coating
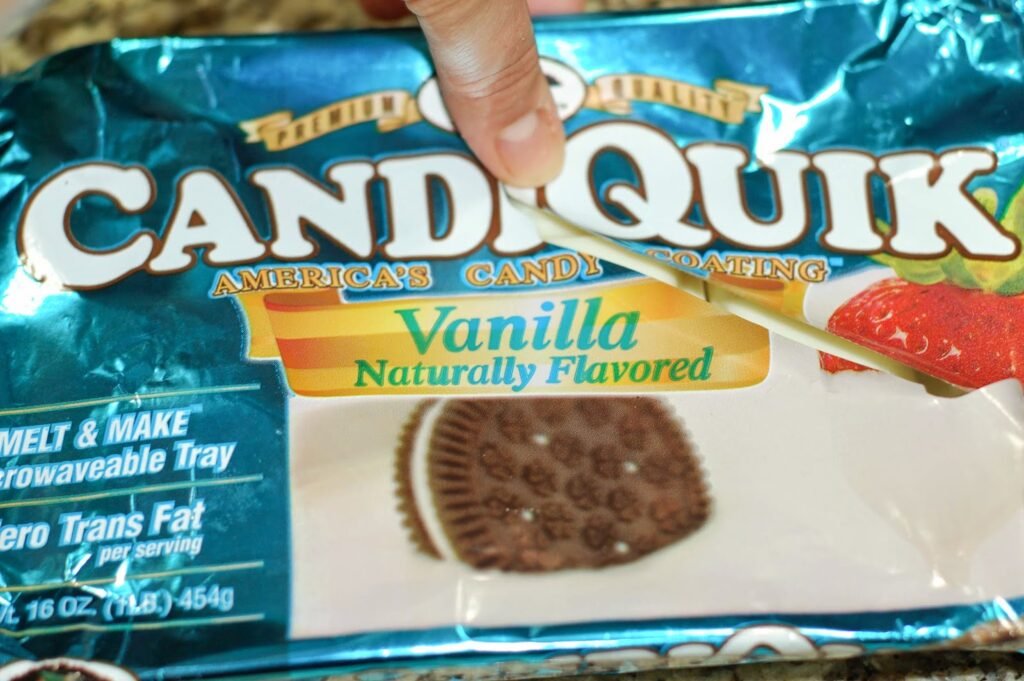
- 1 package (16 oz.) Candiquik Vanilla candy coating (white)
- 1 package (12 oz.) Wilton’s Candy Melt wafers (pink)
- 1 package (12 oz.) Wilton’s Candy Melt wafers (yellow)
Tools needed
- silicone flower pop mold
- 52 lollipop sticks
- 1 box (12) Wilton’s disposable candy decorating bags
Optional toppings
- pink, white, and yellow sugar crystals
Instructions
For the cookie dough
In a stand mixer, cream together the butter and sugars. Then add the cookie spread and vanilla, mix on low until well blended.
In a small bowl mix together the meringue powder and water, then add it to the mixer bowl and mix well.
In a medium bowl combine the flour, baking soda, and salt. Next add it to the mixer bowl a little at a time while mixing on low until dough starts to form.
Last, add the chocolate chips and mix until all incorporated.
Lightly dust your silicone molds with flour, removing any excess.
Add a small amount of cookie dough to each cavity pressing down with your fingers until cavity is full, and making sure the top of the dough is flush to the mold.
Place a Candiquik square in a small microwave safe bowl, and melt in the microwave according to instructions on the package (usually 30 second at a time until fully melted).
Dip the tips of the lollipop sticks into the candy melt, then carefully insert them into the bottoms of the flower. (I place my hand on top of the cookie dough while inserting the sticks to insure they would go in correctly.)
Place the molds in the freezer for 1/2 hour to 1 hour until they are firm enough to pop out of the mold. (I placed the pops in an airtight container and kept them in the freezer until it was time to dip them in the candy melt.)
For the candy coating
Using one color at a time, melt your candy coating in the microwave according to instructions on the package. Make sure your candy coating is not too hot, just warm. (If your candy coating is not smooth, you can add a little bit of vegetable shortening to it, 1/2 teaspoon at a time.)
Remove a small batch of cookie dough pops from the freezer and dip them in the candy melt. Swirl them around upside down a bit to remove any excess candy melt, then place them upright in a pop holder until the candy melt hardens. (I had to place mine in the fridge because my kitchen was a bit too warm that day.)
Repeat process for all pops, using the different colored candy coating.
For the centers of the flower pops, pour melted candy coating into a disposable candy decorating bag with tip cut off and add a small dot of candy coating in the middle. Make sure you candy coating is not too hot, wait for it to be just warm. It will make piping easier and will save you from burning your hands. (If your candy coating hardens up in the bag, just pop it back in the microwave for about 10 seconds or so.)
Once all the candy melt has set, you really don’t need to keep these pops refrigerated. Remember there are not eggs involved. Just keep them in an airtight container.
Optional toppings
If you are using sugar crystals, sprinkle them on before candy melt is completely set.
Enjoy!
Cookie dough recipe adapted from Chocolate Chip Cookie Dough Cake Pops by My Little Cupcake Blog
This recipe may be shared at these fabulous link parties.
Related Posts


Subscribe for New Racipies
Get mental health tips, updates, and resources delivered to your inbox.
Pumpkin Soynut Butter Chocolate Chip Cookies

I can’t believe it is November already. There are only seven more weeks until Christmas. I suppose I should get a move on my Christmas shopping. Every year I say I am going to start early and every year I am running around last minute. There is so much to do. Oh well, I guess I will just eat another cookie to deal with the stress. These bite size cookies don’t taste fattening and they have some healthy attributes like pumpkin and soynut butter, so maybe I will have two.
I wanted to make pumpkin and peanut butter cookies, but I didn’t want to have to pull out the Epi Pen for my two year old son. And since he loves cookies and I am a nice mom (most of the time), I used soynut butter instead. Every time he sees me baking he circles me saying “mmm, nom, nom” until I give him a treat. Sometimes I barely get my goods out of the oven and he is there with his goofy grin. Apparently he inherited my sweet tooth.
The first time I made these I didn’t add the pumpkin pie spice. The cookies were still tasty, but lacking some extra punch. So when I made the second batch, I added 2 teaspoons pumpkin pie spice and that added just the right amount of flavor boost to make these special.
I really did enjoy the soynut butter flavor in these. You can definitely change it to peanut butter if you want, but for those with peanut allergies like my son, the soynut butter works great.
I also like that these cookies don’t flatten out. They stay fluffy and light. I adapted this recipe from my Maple Chocolate Chip Zucchini Cookies recipe.
Pumpkin Soynut Butter Chocolate Chip Cookies
by The Sweet Chick
Prep Time: 15 minutes
Cook Time: 15 minutes
Keywords: bake dessert snack nut-free pumpkin chocolate chips soynut butter cookie
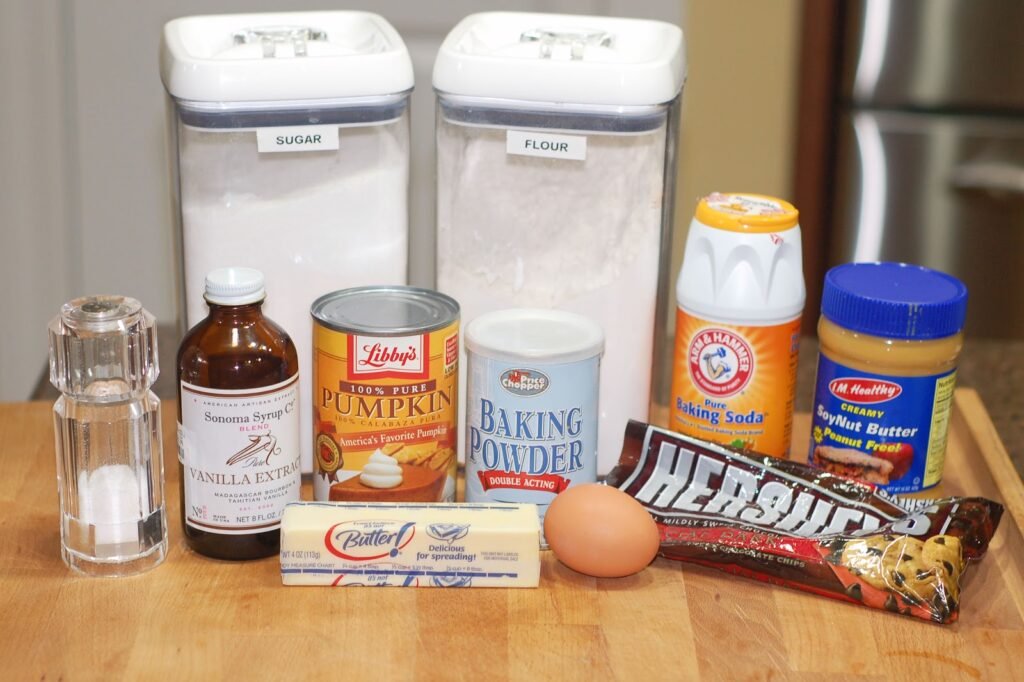
Ingredients (40 cookies)
- 1/2 cup butter
- 1 cup sugar
- 1 egg, beaten
- 1 teaspoon vanilla extract
- 2 1/2 cups all purpose flour
- 2 teaspoons pumpkin spice
- 1/4 teaspoon salt
- 1 teaspoon baking powder
- 1 teaspoon baking soda
- 1 cup canned pumpkin puree
- 1/2 cup soynut butter
- 1 cup dark chocolate chips
Instructions
Preheat oven to 350º F.
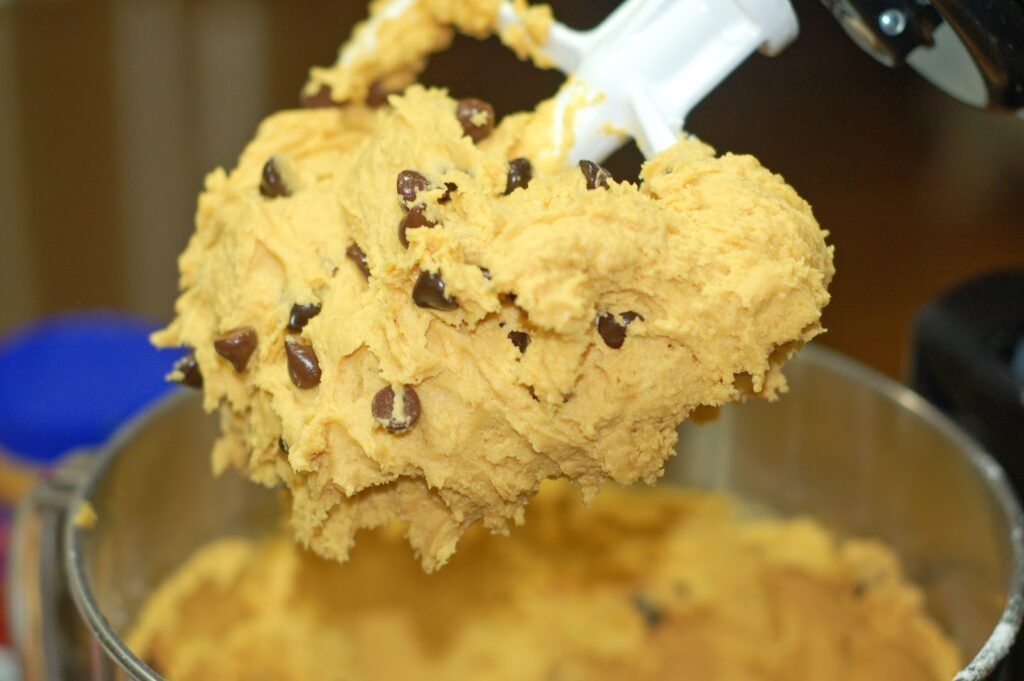
In a stand mixer add butter, sugar, egg, and vanilla. Beat on low until well mixed and texture is smooth.
In a separate bowl combine flour, spice, salt, baking powder and baking soda. Stir until all is well blended.
Then slowly add dry mixture to the wet mixture and beat on low until it becomes a dough like consistency.
Then add the pumpkin puree, and soynut butter and give it a good mixing.
Finally, add the chocolate chips and mix until they are evenly distributed throughout the dough.
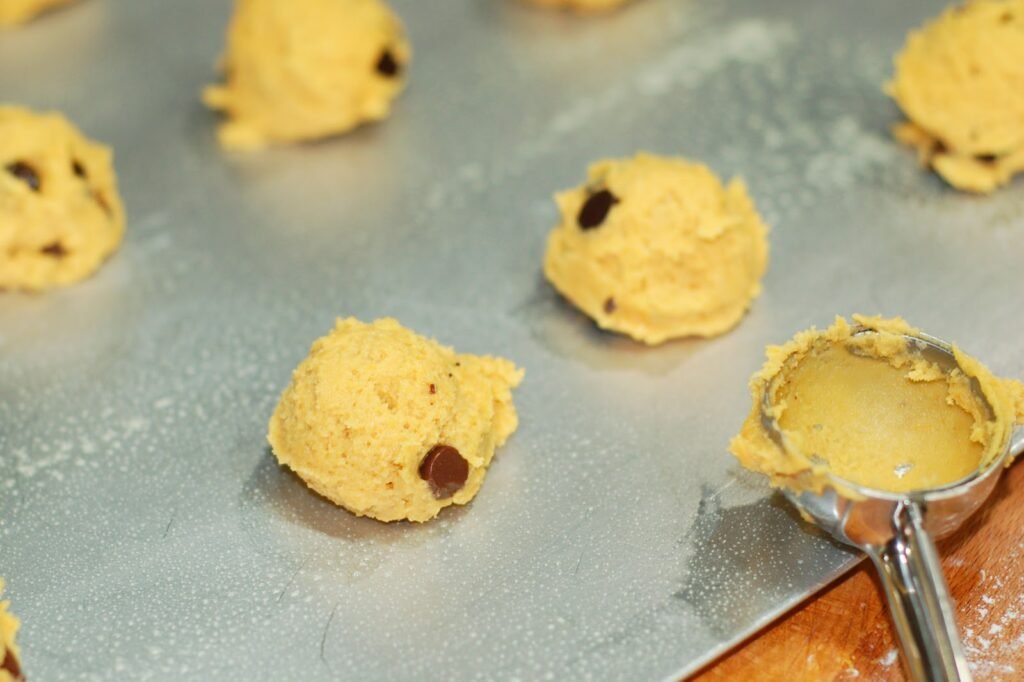
Using a spoon or cookie scoop, drop by tablespoon or so onto a greased cookie sheet leaving 2 inches between each dough ball.
Bake for 15 minutes or until the tops are slightly golden. Remove from the oven and wait 5 minutes, then remove from cookie sheet and place on cooling rack until completely cooled.
Related Posts
Subscribe for New Racipies
Get mental health tips, updates, and resources delivered to your inbox.