
Salted Pumpkin Caramels

One of my biggest motives for food blogging is to fulfill these long-built-up desires to make foods I’ve never made before. What I mean is, it, the blog that is, and wanting to keep it reasonably interesting, becomes the impetus to try new things.
Take marshmallows for instance. Oh my gosh, I’ve been wanting to make them for years. Years! But what compelled me to finally go for it was this, my little online space, and wanting to share the results with all of you.
Which leads me to these caramels. Do you know how intimidating candy-making has always seemed to me? What with the scalding, spattering liquid, and the weird chemical properties of sugar that make it do wacky things at high temperatures, and the fact that I didn’t have a candy thermometer, it seemed too daunting.
But I did it. It may have taken two tries, but I did it. (I was really hoping it wouldn’t take three.)

There’s nothing that can quite prepare you for the execution of caramel-making. I mean, I know it’s not as exciting as sky diving, nor as important as, I don’t know, heart surgery or hostage negotiation, but the thrill you get out of it can be just as exhilarating. Should I switch from second-person to first? I don’t think many people would describe caramel-making as exhilarating, haha.
Let’s stick with second.
You start off with a huge vat of disparate ingredients, that you stir, stir, stir. It begins to foam and hiss, jump up and spatter onto the sides of the pot. And all the while, it’s slowly changing color, changing in aroma. Reaching bona fide caramel takes awhile, but you know you’re on to something when you begin to recognize the smell, and when it hits you full in the face, it’s as heavenly as it is familiar. You’ve smelled it before. It’s caramel.
It’s so affirming, the feeling that you’ve created something, like really created something, out of scratch, out of the simplest of ingredients. I felt this way the first time I made chocolate chip cookies successfully (we’ve all overbaked them, admit it!), the first time a loaf of yeasted bread came out of the oven with actual air pockets in it. Cooking and baking are incredibly positive experiences for me.

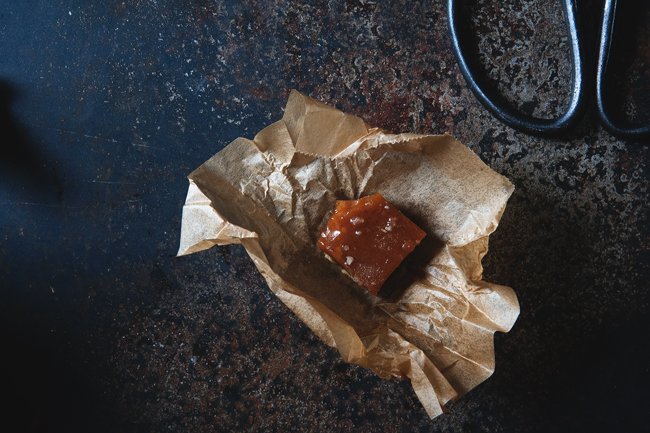
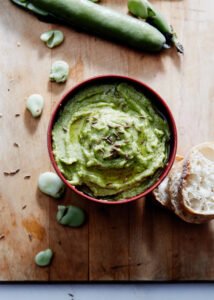
But before I get too ahead of myself, waxing poetic on the spiritual aspects of caramel-making, I should tell you, I don’t think mine came out quite right. They’re a bit too hard, so that you feel like you’re getting a jaw workout chewing on them. But they’re delicious nonetheless, with the taste of the pumpkin really complementing the caramel perfectly. Add to that roasted pumpkin seeds and the final flourish of sea salt, these candies are not cloyingly sweet at all. But they are perfectly suited for the season, or rather, the amalgam of two seasons, because we are at a crossroads right now, are we not?
On my first try, the hot sugar and cream mixture wound up turning into toffee, so at least I managed to avoid doing that again. The failure also taught me how important it is to calibrate your candy thermometer, because a couple degrees can make a huge difference. Mine is apparently off by four degrees, meaning it registers the temperature of boiling water as 216 degrees Fahrenheit rather than 212.
If you do decide to make these—and you should because they’re wonderful—I hope you feel as triumphant as I did, even if it’s your 87th time making caramel. And then give them away as fast as possible, because what’s a person to do with 81 pieces?!

SALTED PUMPKIN CARAMELS
From Food52
Makes 81 1-inch caramels
Ingredients:
- 3/4 to 1 cup roasted pumpkin seeds
- 1-1/2 cups heavy cream
- 2/3 cup pumpkin puree
- 1 tsp pumpkin pie spice (1/2 tsp cinnamon, 1/4 tsp ground ginger, 1/4 tsp nutmeg, pinch allspice)
- 2 cups white sugar
- 1/2 cup light corn syrup
- 1/3 cup maple syrup
- 1/4 cup water
- 4 Tbsp unsalted butter, cut in chunks
- 1 tsp lemon juice
- 3/4 tsp sea salt
Tools:
Candy thermometer
Directions
Line the bottom and the sides of a 9-inch square baking pan with parchment paper. Butter the parchment on all the sides. Evenly spread out the pumpkin seeds on the bottom of the pan.
In a saucepan, combine heavy cream, pumpkin puree and spices. You want the mixture to be warm and foamy, but not boiling. Set aside.
In a second heavy bottomed pan, with sides at least 4 inches high, combine the sugar, both syrups, and water. Stir until the sugars are melted, Then let it boil until it reaches 244 degrees F. Then very carefully add the cream and pumpkin mixture, and slowly bring this mixture to 240 degrees F as registered on a candy thermometer. This will take awhile (around 30 minutes), but watch it and stir occasionally. You’ll want to stir more frequently once it hits 230 degrees to keep it from burning on the bottom of the pan.
As soon as it reaches 240 degrees, pull it off the heat and stir in the butter and lemon juice. Stir vigorously so that the butter is fully incorporated.
Pour the mixture into the prepared pan. Let cool 30 minutes, then sprinkle the salt on top. Let the caramels fully set (at least 2 hours) before cutting them into 1-inch squares. Wrap in wax paper.

Related Posts

Subscribe for New Racipies
Get mental health tips, updates, and resources delivered to your inbox.
Rice Krispie Cupcake Pops


Been busy around here with graduations and birthdays. Here is a cute treat I made for my daughter’s class to celebrate her birthday this month. It’s quick, easy, and no bake. Perfect for a summer birthday. And who doesn’t like Rice Krispie treats.

I bought this cute set of cupcake cookie cutters as Walmart, fully intending to bake up some cookies, but I really didn’t want to turn on the oven and heat up the whole kitchen. So I came up with this idea.

You just make a batch of Rice Krispie treats, cut out the cupcake shape and decorate with candy melt. I put mine on popsicle sticks for some extra fun.
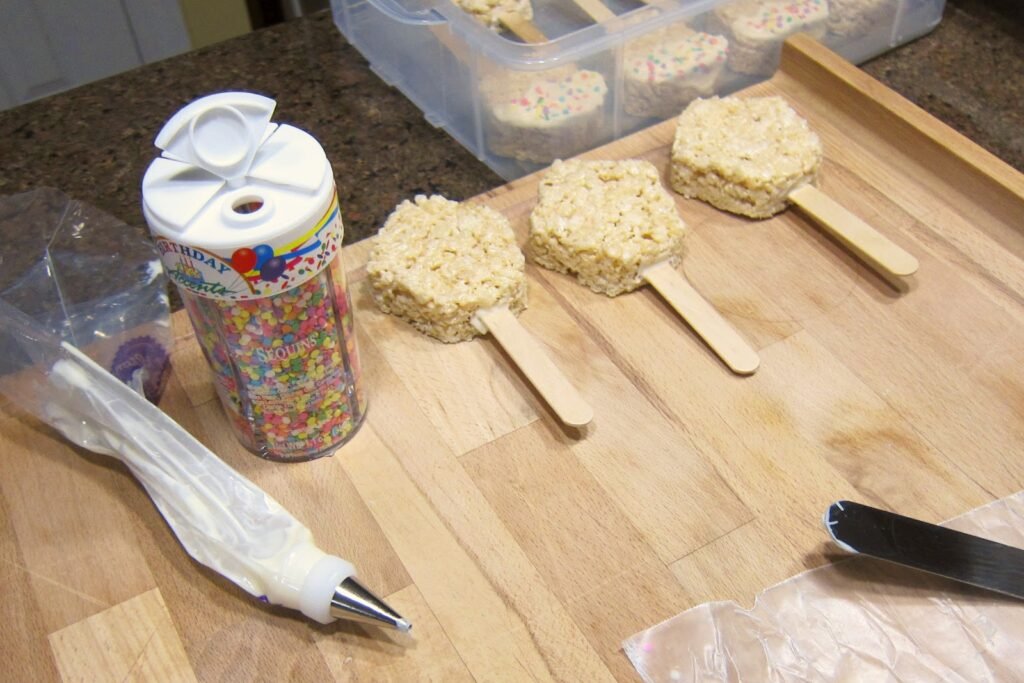
I used Wilton #1 decorating tip to outline and fill in the cupcake design.

I really like how they came out and the kids loved them too.

Rice Krispie Cupcake Pops
by The Sweet Chick
Prep Time: 20-30 minutes
Cook Time: 10 minutes
Keywords: no bake dessert rice krispies birthday Rice Krispie Treats
Ingredients (about 12 cupcake pops)
For Rice Krispie Treats
- 3 tablespoons butter or margarine
- 1 package (10 oz.) regular marshmallows or 4 cups of mini marshmallows
- 6 cups Rice Krispies cereal
For Decorating
- 2 cups white or pink candy melt wafers
- 2 cups light or dark chocolate candy melt wafers
- 1 cup red candy melt wafers
- sprinkles
Also needed
- cupcake cookie cutter
- disposable cake/candy decorating bags
- Wilton cake decorating tip #1 (optional)
- popsicle sticks
Instructions
1. Melt butter over low heat in a large pot. Add marshmallows and stir until completely melted. Remove from heat.
2. Add Rice Krispies cereal. Stir until cereal is all coated with the marshmallow/butter.
3. Using a buttered spatula or wax paper, spread the Rice Krispies mixture onto a wax paper on a flat surface or in a greased jelly roll pan till about a half inch thick.
4. Use your cookie cutter to cut out shapes. You should be able to to yield 12 cupcake shapes. Use every last bit of mixture. Just keep compressing it together to cut out your shapes.
5. Place completed cupcakes into the fridge for 15 minutes to firm up before decorating.
6. Meanwhile melt the white/pink candy wafers one cup at a time in the microwave, preferably in a glass container as per instructions on package. ( I use a glass measuring cup, because it makes it easier to pour the melted candy into the decorating bags later.) Dip the popsicle sticks in the candy melt (only a small dab) and insert in the firmed up Rice Krispie cupcakes.
7. Then pour the remainder of the candy melt into a disposable decorating bags. Using a Wilton #1 cake decorating tip or cutting a very small hole in the tip of the decorating bag, outline the frosting part of the cupcake shape on the top of the Rice Krispie treat, then fill in.
8. Carefully add sprinkles to the white/pink candy melt and place cupcakes back in fridge for 5 minutes to harden the candy melt.
9. Next melt the chocolate candy melt and outline and fill in the bottom half of the cupcake design in the same fashion. While the chocolate candy melt is hardening, prepare your red candy melt and pipe on a small red circle on top of the cupcake design for the cherry.
10. You can store the treats in an air tight container for two days at room temperature or in the fridge for up to five days.
Related Posts


Subscribe for New Racipies
Get mental health tips, updates, and resources delivered to your inbox.