
Tequila Lime Coconut Fudge

Medically reviewed by Christiana George Updated Date: December 17, 2022


So this happened the same day as my Lime Coconut Rice Krispie Treats with Tequila. I figured while I had the bottle of tequila out, I’d make good use of it. I did take a few sips of it and hoowee that stuff was strong. Don’t worry, although you do taste the tequila in the finished product, it’s balanced with the sweetness of white chocolate and citrus flavor of the limes. There is no burning sensation as you eat it, only an “OMG this is delicious” moment.

I ended up using two different white chocolates in this recipe due to the simple fact that I didn’t have enough of the Baker’s chocolate to complete the recipe and I was not going to get in the car to go get some. You are free to use whichever white chocolate you prefer.
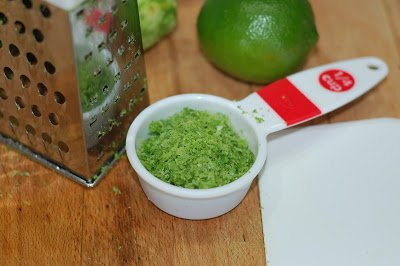
I know that 1/4 cup lime rind does sound like a lot, I thought so at first also, but I gave the recipe a chance. And in the end, the lime flavor is not over powering at all.
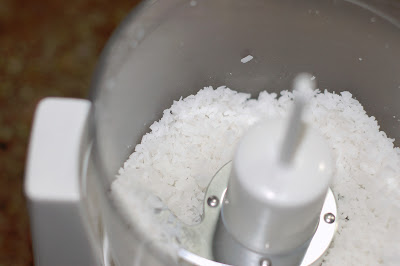
I wanted a smooth fudge, so I put the shredded coconut flakes in the food processor and pulsed it a few times to get the flakes even finer.

You do have to keep a close eye on the boiling milk, or it will scorch. Just keep stirring.
Mmmm…lime zest. It smells so good. I need to find myself a lime candle to keep in the kitchen. I did find that my chocolate starting hardening up once I took it off the stove, so I ended up putting it back on the stove top on low to be able to blend everything smoothly and it worked.
It came out perfect, smooth and creamy. You can taste all the flavors in this one, the limes, coconut, and tequila. They all pay off of one another, and blend together as one flavor, without one being more overpowering than the other. If you like lime and coconut, you have got to try this.
Tequila Lime Coconut Fudge
by The Sweet Chick
Prep Time: 15 minutes
Cook Time: 10 minutes
Keywords: stove top dessert snack coconut limes tequila fudge American summer
Ingredients (64 squares)
- 1 can (5 oz.) evaporated milk
- 1 2/3 cups sugar
- 1/2 teaspoon salt
- 12 large marshmallows
- 12 oz. Baker’s Premium White Chocolate Baking Squares
- 1/2 cup white chocolate chips
- 2 tablespoons tequila
- 1/4 cup grated lime rind
- 2 tablespoons lime juice
- 1/2 cup shredded coconut
Instructions
In a large saucepan, combine milk, sugar and salt.
Cook over medium heat, stirring constantly until the mixture comes to a boil.
Then cook for 8 minutes, again stirring constantly so that the milk does not scorch at the bottom of the saucepan.
Remove from heat and stir in the marshmallows, chocolate, tequila, lime rind and juice.
If you mixture begins to harden up, simply place pot back on stove top and heat on low until the mixture becomes soft and smooth.
Next add in the coconut flakes and stir until all incorporated and pour into an 8×8 pan lined with parchment paper and spread out evenly.
Then place in fridge until completely set, about 1-2 hours.
Cut into squares, eat, and enjoy!
Related Posts






Subscribe for New Racipies
Get mental health tips, updates, and resources delivered to your inbox.
Is kiwi Acidic? Is it good for You?


Kiwi fruit has a mesmerizing tangy taste with a unique and attractive appearance. It has furry brownish-green skin and an oval shape. Kiwi smoothies and kiwi in salads are very popular throughout the world.
However, a question often comes to mind while eating this tasty fruit: is kiwi acidic?
The short answer is yes, kiwi is acidic. All types of kiwi have a pH under 4, mostly in the range of 3.1 to 3.96. Anything with a pH less than 7 is acidic, and things with a pH less than 4 is moderately to highly acidic. Kiwis contain quinic, citric, and malic acids, which are responsible for the fruit’s level of acidity. Because of the acidity of this fruit, it may not be the best choice for people suffering from acid reflux.
In this article, let’s discuss some interesting facts about Kiwi fruit.
Kiwi Fruit – Acidic, Alkaline, or Neutral?
The categorization of compounds as acidic, alkaline, or neutral depends entirely on the pH of the compound. Anything with a pH less than 7.0 is acidic, and the lower the pH, the more acidic it is. Anything with a pH higher than 7.0 is alkaline, and the higher the pH, the more alkaline the compound is.
Acidic foods are acidic because of the individual compounds they contain. In the case of kiwis, they contain acids including citric acid, quinic acid, and maleic acid.
Malic acid comprises about 10% of the acids in kiwi, and the remainder is split fairly evenly between citric acid (40 to 60%) and quinic acid (40 to 60%).
pH of Kiwi
Not all kiwi have exactly the same pH. The pH of a kiwi varies by the variety of kiwi, and also how ripe the fruit is. pH values of kiwi ranges from 3.1 to 3.9. Let’s look at these values in more detail.
| Name | pH range |
| Green Kiwi Fruit | 3.1 to 3.4 |
| Golden Kiwi | 3.7 |
| Kiwi Berries | 3.1 to 3.9 |
| Hardy Kiwi | 3 |
| Red kiwi | 3.1 to 3.9 |
Are kiwis good for you? (5 Reasons You Should Eat Kiwis)
In short, yes! Kiwi is good for you. It is an essential source of vitamins and minerals. Several of the reasons that we should eat kiwi are that it can increase heart health, digestive health, and even the body’s immunity against diseases. So let’s take a brief look at the five most attractive benefits.
#1 Assist in Weight loss
Kiwi contains high levels of dietary fiber and is fairly low in calories. Therefore, it is an ideal fruit for people on a diet. Eating a reasonable proportion of kiwi daily can be very helpful in their weight loss journey.
#2 Blood Pressure Control
Kiwi is a very beneficial fruit for people with high blood pressure. One study showed that people who ate kiwis demonstrated a reduction in their blood pressure. So, patients known to have high blood pressure can drink kiwis smoothies or eat kiwi in salads as a way to help control their blood pressure. An added benefit is that kiwi has a fairly high water content, which makes it a hydrating food.
#3 Increase immunity
Kiwi is a fantastic source of vitamin C. Vitamin C is essential to strengthening the body’s immunity system, and its ability to fight various diseases. The immune system is important to fighting off viral, bacterial, and fungal infections. People who would like to strengthen their immune system should consider adding kiwi as an excellent source of vitamin C.
#4 Healthy skin
As we said above, kiwi is an excellent source of vitamin C. Kiwi also contains antioxidants. Both of these types of compounds are known to be good for the skin. Eating kiwi is one way to achieve healthy glowing skin. In addition to eating kiwi, kiwi is in some cosmetics and skin products. It is thought to have moisturizing and rejuvenating properties, which are characteristics many people are fond of.
#5 Prevention of constipation
Constipation can be a really uncomfortable condition. But, you can avoid it. How? Kiwi smoothies and raw kiwi can prevent constipation. Kiwi is a rich source of dietary fiber and water, which are two of the most important elements in treating constipation. So, kiwi is a great choice for people suffering from constipation.

| Nutrient | Concentration in 1 Kiwi (69g) |
| Dietary Fiber | 2.1 gram |
| Vitamin C | 64 mg |
| Carbohydrates | 10.1 gram |
| Energy | 42 calories |
| Calcium | 23.5 mg |
| Vitamin E | 1.0 mg |
| Potassium | 215 mg |
Does kiwi affect acid reflux?
People who have acid reflux should avoid Kiwi; you may wonder why. The reason behind this is that Kiwi is an acidic fruit. Kiwi can increase acidity in the stomach of acid reflux patients.
The elevated amount of acid can cause a burning sensation, vomiting, and irritation of the esophagus. According to healthcare professionals, Kiwi does affect acid reflux.
Sometimes, patients who eat Kiwi with acid reflux complain about gassy bloating in the stomach, a bitter taste, and irritation in the lining of their esophagus. It is due to the backward movement of acid from the stomach to your mouth.
Anything you eat can have either a positive or negative effect on your body. It is important to make choices that have the most positive effect on your body. For those with reflux, kiwi may not be the best choice.
Is yellow kiwi fruit acidic?
Yes, yellow kiwi fruit is acidic. However, it is somewhat less acidic than green kiwi. Yellow kiwi is sweet, and not as tangy as green kiwi, which has a more tangy taste.
Research has shown that yellow kiwi has a pH of 3.7, which means that yellow kiwi is also an acidic fruit. Therefore, you can get the nutritional benefits of kiwi from a slightly less acidic fruit by eating yellow kiwi instead of green ones.
Is golden kiwi acidic?
Yes, golden kiwi is also an acidic fruit. According to some people, their taste is intermediate between the taste of mangoes and strawberries. But don’t be fooled by their sweet taste. It doesn’t mean that golden kiwi is not acidic. Like green kiwi fruit, gold kiwi also contains citric acid, quinic acid, and malic acid, and is definitely acidic.
Are kiwi berries acidic?
Kiwi berries are also acidic, like kiwi fruit. They’re juicy with a sweet and tangy taste. In appearance, kiwi berries look like miniature kiwi fruits. Like kiwi fruit, they have a high citric acid content, which means they are acidic as well. They are used as a snack around the world. They are quite popular because they are low in calories but high in nutrition.
FAQs
Is kiwi acidic food?
Kiwi fruit is acidic food. It contains a high concentration of citric acid, malic acid, quinic acid, and folic acid. It is about as acidic as an orange, but less acidic than lemons and limes. Due to its acidic nature, it has specific effects on the human body. It can increase acidity in the stomach, which results in exacerbating symptoms of acid reflux.
Does Kiwi have lots of acids?
Yes, kiwis do have lots of acids. As a breakdown of the acid content, about 40 to 60 percent is citric acid, nearly 40 to 60 percent is quinic acid, and the remaining 10 percent or so is malic acid. The presence of these acids indicates kiwis are acidic. Their pH range is around 3.
Which fruit is most alkaline?
Watermelon is one of the most alkaline fruits. Most fruit is at least somewhat acidic, but watermelon is very close to neutral. In addition to this, coconut, bananas, and papayas are close to neutral.
Can you eat kiwi fruit with acid reflux?
You cannot eat kiwi fruit with acidic reflux because kiwi is a fairly acidic fruit. Therefore, if a person with acidic reflux consumes kiwis, he or she is likely to face the bitter consequences of it. In addition, the burning sensation in the esophagus, commonly known as heartburn, may increase.
What are the disadvantages of kiwi fruit?
Kiwi fruit has certain disadvantages. It can cause hives in people. It can cause severe allergic reactions to those who are allergic to fruits. Although Kiwi is healthy fruits, they have many adverse effects as well on the body.
Bottom Line
To conclude, Kiwi is a beneficial fruit for our health with a unique sweet and tangy taste. The main point of the above discussion is the question, “are kiwis acidic?” And to answer this, yes, kiwis are acidic, and for this reason, patients with acidic reflux should avoid eating them. It can increase their acidic reflux and bring discomfort to them. It should now be clear that kiwi does affect acidic reflux. A healthy person, without any symptoms of GERD, can add kiwi to his balanced diet, and enjoy the health benefits of doing so.
Related Posts



Subscribe for New Racipies
Get mental health tips, updates, and resources delivered to your inbox.