Korean Fried Chicken

Christiana George
Korean Fried Chicken

I have had the most incredible hankering for Korean food recently. I can’t explain it, except that this current weather makes me want to cuddle up with a bowl of soondubu and freshly cooked rice, made in a stone pot of course. I also just recently discovered Maangchi, who is just about the cutest woman alive other than my mom. They remind me an awful lot of each other actually.

Maangchi doesn’t do anything in half measures, meaning everything she cooks is in huge quantities. She whips out 10 pounds of kimchi at a time, fries huge basins of japchae. I can’t imagine the number of people she cooks for, but in the case of the recipe I’m sharing today, she deep-fried three pounds of chicken wings. For Chris and me, two to three wings/drumettes each, so maybe half a pound of chicken total, is sufficient. Although maybe we’re just light eaters. It’s hard to say.

But hold it! I’m misleading you, aren’t I? I actually didn’t end up following Maangchi’s recipe. It was pretty good, but I found that I preferred Saveur’s version better. The two taste totally different; I just found her version to be a bit cloying. (Also, I don’t understand why corn syrup seems to end up in a lot of Korean dishes—is it a common ingredient? And why?)


Korean Fried Chicken

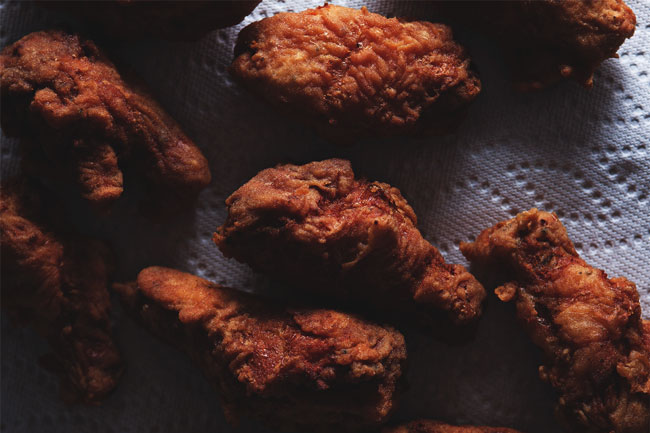
What the two versions have in common—and what makes Korean fried chicken so dang addictive—is that the chicken is fried twice. This results in a Seriously Crispy Crust. It’s the difference between a weak handshake and a firm one, sallow and sturdy. A robust crust, if you will. I think it’s dead simple and pretty genius. (The only downside is that you have to withstand being barraged by oil twice as long. Actually, come to think of it, that’s a pretty big downside. Deep-frying is freaky. Make sure you wear long sleeves. And gloves. And clear everything away around the perimeter of the pot because it’s going to get dirty.) And then you smother it in a hot-garlicky-mouth-puckering sauce and away you go!

(On an unrelated note, if you follow me on Instagram, you might know that I was in California last week, where I got to meet the newest generation of the Anderson clan, aka Chris’s brother’s four-and-a-half month old son and our nephew! I get a little giddy calling him this, because it didn’t really occur to me that he WAS related to me until Chris’s sister-in-law [which makes her my sister-in-law?] called me Aunt Linda. Aunt Linda! That’s so exciting! And now that I’ve seen him and fallen in love, I want to buy him things like this onesie. What do you think? Isn’t it adorable?? [Now my mom thinks I want to start popping them out. Ha. Ha ha ha. Sorry Mom. You’ll have to give me time.])

Korean Fried Chicken

KOREAN FRIED CHICKEN (aka KFC)

From Saveur

Makes 16 pieces

Ingredients:

  • 5 cloves garlic, chopped
  • 1 (1.5″) piece peeled ginger, chopped
  • 3 Tbsp soy sauce
  • 3 Tbsp gochujang
  • 1.5 Tbsp rice vinegar
  • 1 Tbsp Asian sesame oil
  • 1 Tbsp honey
  • 2/3 cup flour
  • 1 Tbsp cornstarch
  • 2/3 cup water
  • 16 chicken wingettes/drumettes (from 8 chicken wings)
  • Canola oil, for frying
  • Sesame seeds and chopped green onions for topping

Directions:

Make the sauce: process the garlic, ginger, soy sauce, gochujang, rice vinegar, sesame oil, and honey with a food processor/immesion blender until blended (or mince the garlic and ginger and whisk the ingredients together by hand).

For the chicken: in a bowl, whisk the flour, corn starch, and water. Add the chicken and toss. In a medium-sized heavy-bottomed pot, pour about 2 inches of oil. Clip a candy thermometer onto the side of the pot and heat the oil until it reaches a temperature of 350 degrees F. Add the chicken pieces gently, but don’t crowd the pot; you’ll have to work in two or three batches. Fry chicken until golden, about 6 to 8 minutes. Drain on paper towels. Reheat the oil to 350 degrees and fry chicken again until crisp and medium brown, 6 to 8 minutes. Drain.

In a large bowl, toss the chicken pieces with the sauce, top with sesame seeds and green onions if using, and serve. With lots of napkins.


New Formula To Support Healthy WEIGHT LOSS

BUY NOW

Subscribe for New Racipies

Get mental health tips, updates, and resources delivered to your inbox.

Black Sesame Macarons With A ‘nutter Butter’ Filling

Christiana George
Black Sesame Macarons

Well hello. Aside from the usual excuses about being busy, blah blah blah, this past week has been something else. Some of you may be aware that I was made a finalist in Saveur’s Best Food Blog Awards, then removed from the ballot, all within a few days. I thought I’d explain what happened.

Black Sesame Macarons

I started this blog in June of 2012, and was thus surprised to see that I’d been nominated in the Best New Blog category. Finalists find out the same time as everyone else—when Saveur announces online that the ballots are officially open—so bloggers don’t get the chance for input before everything goes public. After checking the official category definitions, which states that a ‘new blog’ is one started in 2013, I emailed one of the editors to let her know of the error. A few days later, she got back to me, apologizing for their mistake and informing me that they’d had to remove me from the ballot.

I won’t pretend I wasn’t upset, mostly by the initial mistake that landed me in the situation to begin with. A simple fact-check would’ve prevented it. But, it would’ve felt wrong to keep up the misconception, so ultimately I guess I ‘did the right thing’, as cheesy as that may sound. I was a bit crushed to see the blank spot on the ballot where my blog had been listed. The finality is always a bit hard to accept, I guess.


In any case, Saveur did apologize profusely, so I can’t hold a grudge. (And I sooo wanted to. I’m a good grudge-holder—blame it on my overly-principled nature.) And my private drama doesn’t make the award any less awesome and prestigious. So guys, if you haven’t voted yet, there’s still time! Let’s honor those whose efforts liven up the food media world and make it way more exciting than it has any right to be!

Black Sesame Macarons

Moving on now. While traditional macarons are made with almonds, you can swap out the nut for any other nut or seed without having to change up quantities or technique (although I’m wondering if macadamian nuts might behave differently because they’re so oily? Not sure.) But since macarons are a bitch to get right in the first place, don’t think these sesame seed versions were a breeze to pull off, because they weren’t.

They are, actually, the product of a year of trying, off and on, over and over. In fact, I finally had to take an official black sesame macaron hiatus after my last attempt flopped back in November. I knew it wasn’t the sesame seed part that was stumping me; I’d somehow just lost my macaron-making mojo. But something—perhaps this burgeoning feeling of fresh starts brought on by spring—reinvigorated me, so I once again picked up my floppy spatula and piping bag and got to it.

I don’t know what changed this time—maybe I picked up some common sense this winter—but I finally made the effort to get to the root of the problem. Too often in the past, I found myself simply hoping for the best as I tossed trayfuls of these liquid gremlins into the oven. That’s a pretty defeatist way of looking at a baked good. Sure, there are lots of things out of one’s control, but a composite of sugar, ground seeds, and egg white? No way. It can and must be vanquished.

Black Sesame Macarons

In the end, getting them to come out perfectly (and I mean perfectly – not a crack in two entire trayfuls!) came down to the placement of the racks in the oven (which heats unevenly; I had to scoot the trays away from the hot corner in the back right) and my ‘macaronage’—the method of mixing together the whipped egg whites and sugar/ground nut mix. About the macaronage, I’ve said this before, but guess who doesn’t learn her own lessons? Don’t baby your batter. The egg whites need to be deflated quite a bit or you’ll get lots of little cracks on the surface of your macarons, effectively ruining an entire batch that you’ll then have to force your family to eat, because you’ll be too embarrassed to share them with anyone else. (Have you seen a cracked macaron? It is a sad sight.)

You have no idea how triumphant I felt when I peeked into the oven mid-bake to discover perfect-looking macarons. I did a little jig in the kitchen.

Black Sesame Macarons

I’d wanted to pair the black sesame with peanut, which is a fairly common combination in Chinese desserts, but didn’t want the filling to veer in the direction of frosting-sweet. The peanut flavor had to come through. Enter Nutter Butter filling, which I always remember as being aggressively peanut-y without tasting overly-processed. Maybe I’m remembering a different version of Nutter Butters as you, but whatever the case, this Thomas Keller version (think Bouchon Bakery) tasted and looked exactly like how peanut butter filling should. The childhood version, flecked with salt and nostalgia. It’s okay if you want to eat it with your fingers. I did.


Once the macarons comes together, the presentation is very striking (if I do say so myself). But, resist eating too many! You must give them a day to ‘bloom’, let the flavors of the shells and filling meld together. Only then can you truly enjoy the essence of the so-temperamental, but so-worth-it French macaron.

BLACK SESAME MACARONS

Makes 20 macarons

Adapted from BraveTart

Sorry to confuse you, but I use weight measurements when making my macarons for the extra precision, and I highly recommend you do too if you’re not already. Also, the Nutter Butter filling makes a tad more than is needed—for me at least. Its peanut flavor is strong, so be careful not to drown out the delicate taste of the macaron shells. I’d sandwich leftover filling between Ritz crackers or something just as salty.

Ingredients:

  • 58 grams black sesame seeds
  • 115 grams powdered sugar
  • 2 egg whites
  • 36 grams granulated sugar
  • 1/4 tsp salt
  • A few drops gel food coloring in black

Directions:

Preheat your oven to 300 degrees F. Line two baking sheets with parchment paper.

Grind the confectioners sugar and sesame seeds in a food processor until fine (this will take awhile, about 3 minutes, as the sesame seeds are harder to grind up), then sift the mixture into a bowl. Most of it should go through, but if a lot doesn’t, toss it back in the food processor and grind for another minute or so.

In the bowl of a stand mixer with the whisk attachment affixed, add the egg whites and sugar. Turn the mixer on to power level 4 and whisk the mixture together for 3 minutes. Next, turn the power up to 7 and whisk an additional 3 minutes. Turn the power up to 8 and whisk an additional minute or two. By now, there should be a stiff meringue in the bowl. Stop the mixer and add a few drops of coloring at this point and turn the mixer back on to the highest speed, whisking for an additional minute to incorporate the color. Knock the meringue that’s trapped in the whisk back into the bowl.

Now, add the sesame seed mixture into the bowl all at once. I’ll reference Stella’s instructions again:


Use both a folding motion (to incorporate the dry ingredients) and a rubbing/smearing motion, to deflate the meringue against the side of the bowl.

The dry ingredients/meringue will look hopelessly incompatible at first. After about 25 turns (or folds or however you want to call “a single stroke of mixing”) the mixture will still have a quite lumpy and stiff texture. Another 15 strokes will see you to “just about right.” Keep in mind that macaronage is about deflating the whites, so don’t feel like you have to treat them oh-so-carefully. You want to knock the air out of them.

You don’t need to be too gentle with the batter. By the time it’s ready, its consistency will be runnier than you’d think, closer to pancake batter than cake batter.

Fill a pastry bag with the batter. You can use a pastry bag with just a coupler, or with a tip. I used an Ateco 806 tip. Pipe your shells onto the parchment-paper lined baking sheets, a little more than a quarter (US currency) in size (about 2 cm. or 1 inch), spacing them about 1 inch apart.

When you’re done piping, pick up the pan and whack it down hard against your counter. Do this another time, then rotate the pan 90 degrees and do the same thing twice. You might see tiny air bubbles appear on the top of the rounds, a good sign because they could be potentially damaging if buried within the batter. Repeat with the other pan. Now leave the pans alone for half an hour—they’ll develop armor (a skin) during this time to protect them in the oven.

Slide the pans into the oven and bake for about 15 minutes, at which point the shells should be able to be cleanly picked off the parchment paper.

Let the shells come to room temperature, then fill your macarons with the peanut butter filling (recipe below). It’s quite thick, so a spoon should work just fine.

‘NUTTER BUTTER’ FILLING

Adapted from Bouchon Bakery

Ingredients:


1/2 cup smooth salted peanut butter
roughly 3/4 cup powdered sugar
1/4 cup (1/2 stick) butter, room temperature
pinch or two of Maldon salt

Directions:

Cream together all the ingredients in a stand mixer. Taste for sweetness, and add more powdered sugar or salt as needed.


New Formula To Support Healthy WEIGHT LOSS

BUY NOW

Subscribe for New Racipies

Get mental health tips, updates, and resources delivered to your inbox.