
Blood Orange And Mint Granita

Medically reviewed by Christiana George Updated Date: June 8, 2023

I was originally intending to share this recipe with you, except the feta frozen yogurt turned out tasting like stale socks. No, doesn’t sound enticing? I don’t think so either.
What redeemed the recipe for me was this granita, which is meant to accompany the froyo kind of like a sidekick. An outrageous and daring one. That ended up stealing the show. First to enter the stage is the bright punch of blood orange, vibrant and vivacious, a vixen if you will. In typical two-step fashion, the mint comes later and imparts its cooling aftertaste reminiscent of my favorite beverage: the mojito.
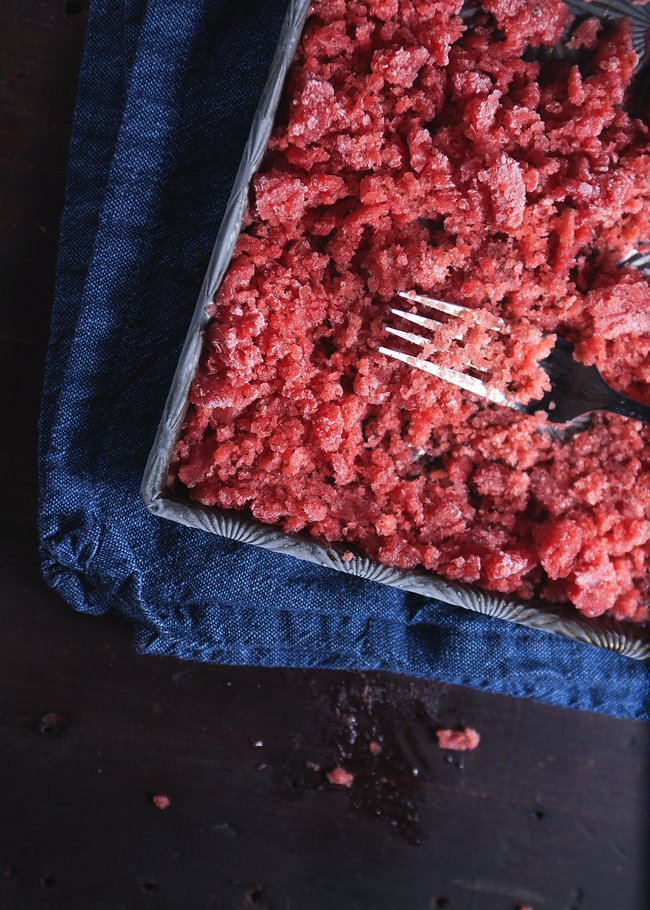
I’m happy I have something to show for my efforts. And is it something! My magpie tendencies kicked into high gear after I’d crunched it up with a fork. All I wanted to do was bottle it up and hold it captive to the light. But, looks aren’t everything, and in this case, this granita functions perfectly as a guilt-free dessert. I mean, it’s basically a deconstructed sno-cone minus the artificial flavoring and more gorgeously-flavored.

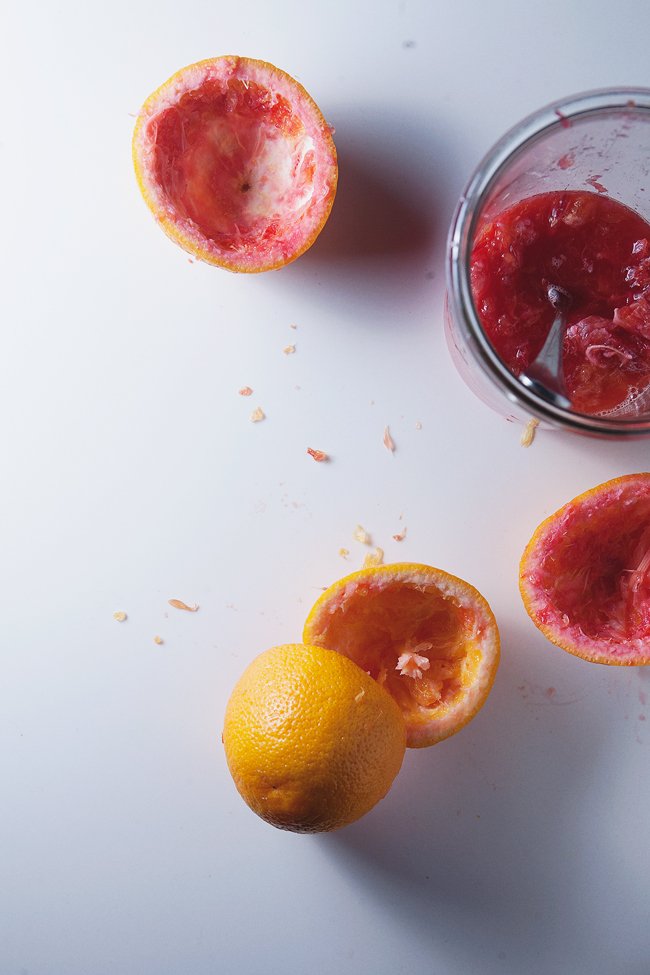
Granitas are so simple to make! More clean-up than preparation, you basically juice and zest the heck out of blood oranges (I believe the proper term is ‘pulverize’ haha), toss a handful of mint in, and blend. Run the sludgy liquid through a sieve, freeze the remains, and ta-da! The granita is born.
BLOOD ORANGE AND MINT GRANITA
From Food52
Makes enough for roughly 4 people
Ingredients:
4 juicy, ripe blood oranges
big handful of mint leaves
lemon juice, if necessary
Directions:
Cut the blood oranges in half and run a knife around the inside rim. Gut them with a spoon over a bowl to catch all the juice, and put the guts into the bowl. (Don’t worry if a bit of rind goes in, as we just want as much pulp and juice as possible.) Zest the orange peels into the bowl. Throw in a handful of mint and immersion blend or food process the mixture til it is quite pulpy.
Strain through a strainer. Pour a thin layer of the liquid into a freezer safe baking dish. Freeze for 2 to 3 hours. When mine was completely frozen, I set the dish on the counter for awhile to let it melt a bit. Then, using a fork, tines facing up, push down into the granita like you’re mashing it. It should give pretty easily if it’s melted enough.
Alternative, you can check on your granita every now and then, raking it with a fork every time it looks like the liquid is freezing. After a couple hours, the granita should be frozen but flaky.
Related Posts


Subscribe for New Racipies
Get mental health tips, updates, and resources delivered to your inbox.
Are Pistachios Healthy? Nutrition & Health Benefits

Are you looking for a healthy snack that is full of nutrients and comes with many health benefits? Well, among the array of choices, pistachios stand out. Now, you might wonder, are pistachios truly a healthy option?
Pistachios are full of nutrients such as Calcium, Vitamin B6, Vitamin C, Iron, Magnesium, potassium, etc. And as for the health benefits, it is high in antioxidants, helps you lose weight, promotes various blood health conditions, and reduces many heart-related problems.
That’s not all. The above information is just an overview. If you are willing to learn more about pistachios, stay with us.
Are Pistachios Healthy?
Yes, pistachios are a healthy food. They are a good source of protein, fiber, healthy fats, antioxidants, and vitamins and minerals.
Pistachios are flooded with nutrition which is good for your body. It does not just contain protein and carbohydrates. It’s also a great source of calories, fiber, fat, thiamine, manganese, vitamin b6, calcium, potassium, phosphorus, and copper.
| Nutrient | Amount per 100 grams | Percent Daily Value (%DV) |
| Calories | 557 | 28 |
| Fat | 47.4 grams | 73% |
| Saturated fat | 6.4 grams | 32% |
| Polyunsaturated fat | 11.9 grams | – |
| Monounsaturated fat | 28.2 grams | – |
| Sodium | 95 milligrams | 4% |
| Carbohydrates | 27.3 grams | 9% |
| Fiber | 10.6 grams | 42% |
| Sugar | 8.2 grams | |
| Protein | 20.7 grams | 41% |
| Vitamin A | 0% | – |
| Vitamin C | 0% | – |
| Calcium | 136 milligrams | 14% |
| Iron | 4.2 milligrams | 23% |
| Potassium | 1072 milligrams | 31% |
| Magnesium | 292 milligrams | 73% |
| Phosphorus | 456 milligrams | 45% |
| Manganese | 2.2 milligrams | 96% |
| Copper | 1.6 milligrams | 89% |
| Thiamin | 0.8 milligrams | 53% |
| Vitamin B6 | 1.1 milligrams | 55% |
In hundred grams of pistachio, you will get this much nutritious value; the main thing is the calories and protein you are getting, which are respectively 557 and 20.7 g.
These percentages are based on “Reference Daily Intake.” These help you to maintain the proper blood and hemoglobin regulation.
There must be many benefits for all those nutrients, right? Let’s take a look at that!
Pistachio Health Benefits
The benefits list of pistachios is long, and this will take some time. Pistachios have many benefits that help keep your body healthy, lose weight, and keep you in shape.
Besides, preventing diseases, maintaining regular blood circulation, and building muscle is also on the benefits list.
Did I mention the other benefits? Well, let’s get into it.
Rich in Nutrients
As discussed in the previous section, pistachios contain various nutrients, such as thiamine, manganese, vitamin b6, calcium, potassium, phosphorus, and copper.
Thiamine is a vitamin b-1, which helps your body consume energy from all other nutrients. Also, it maintains the development of your blood cells.
On the other hand, manganese, calcium, potassium, phosphorus, and copper help your body to,
- Increase and development of tissue, bones, proper and hormones.
- Proper brain function and nerve system.
- Build strong muscles and repair damaged cells.
- Prevent high blood pressure and diabetes.
- Regulate proper heartbeat.
- Maintain and increase the immune system and blood function.
Besides these, there is more!
High In Antioxidants
Do you know antioxidants can reduce the risk of cancer or heart diseases? Or any diseases?
As we know, you will find lutein, γ-Tocopherol, and zeaxanthin in the pistachios. Gamma tocopherol helps reduce the risks of diseases and also minimizes the possibility of brain disorders such as Alzheimer’s.
On the other hand, lutein and zeaxanthin are great for the health of your eyes. Those improve your visual sensitivity to the eyes, enhance vision sharpness, protect your eye tissues from sunlight damage, and so on.
Low In Calories
Usually, nuts are filled with high calories. But pistachios have low calories compared to other nuts in this category.
28 grams of pistachios contain;
- One hundred fifty-nine calories. Which is very low, 20%, compared to other nuts.
- Contain 20% of the weight.
- A high amount of amino acid helps your body dilate blood vessels.
Aid Weight Management
Pistachios can help you in the journey of weight management. Those can help you gain weight and even lose weight.
Let’s see first how it can help you lose weight. As we know, pistachios have fiber and protein. What these do is give you a feeling of fullness. And you don’t have the urge to eat more.
A study shows that people who eat pistachios regularly have lower body mass index. One of the reasons for this could be that the fat item doesn’t release from the pistachios wall. It results in not digesting the fat.
On the other hand, pistachios can also be a reason for gaining weight. As they are a go-to snack item, you can eat them in large amounts.
Even though they contain fewer calories, eating more than what you should cause you to consume too many calories. If you cannot lose those calories, you might gain weight.
Promote Blood Health
Pistachios help your blood health on many levels, such as blood sugar control, improved blood pressures level, lower cholesterol level, and blood vessel health.
A study shows that pistachios help the good cholesterol to increase and bad cholesterol to decrease. It also helps improve the blood pressure level.
Besides, pistachios have endothelium in them. And guess what! Endothelium reduces vasodilation which results in decreasing blood flow, which results in promoting blood vessel health.
That’s not all! Antioxidants in the pistachios help lower the blood sugar level and overall blood sugar health.
High In Protein For Vegans And Vegetarians
In 28 grams of pistachios, there are 6 grams of protein. Besides, it contains a good amount of amino acids, making it perfect for vegans and vegetarians.
Pistachios provide enough calories and protein to make you feel full. And give them the energy to go through. As a bonus, it helps manage their weight.
Important For Heart Health
As we know, it contains amino acids, which lowers cholesterol level. And that results in reducing the possibility of heart diseases such as heart attack.
Pistachios are also filled with fiber, which makes them the perfect snack for a heart-healthy option.
Reduce Colon Cancer Risk
Do you know pistachios can reduce colon cancer risk as well? It’s true. As it contains high fiber, it can help lower cholesterol and reduce the risk of colorectal and colon cancer.
Besides, it can help you lose and maintain a healthier weight over time.
Beneficial For Gut Health
Improving gut health is one of the most significant benefits of pistachios. First, it contains a high amount of fiber and moves your gut undigested.
Therefore, there are gut bacteria that turn them into fatty acids. That helps to reduce and improve the digestive system and other heart diseases.
Besides, it also increases the number of good bacteria, which pushes out harmful bacteria. This maintains the balance and makes your gut healthier.
What’s The Healthiest Way To Eat Pistachios?
Pistachios are great as a snack containing vitamin E, B vitamins, copper, and iron. And it also helps with mindfulness and maintaining weight. But there are some ways to consume this:
- You can make pesto with it. Then eat this with fish bread or salad or trail mix.
- Use it as a nut-based crust with cream pie, especially coconut lime cream pie.
- Crushed pistachios in muffins or banana bread and also cookies.
- Pesto mixed with olive oil and fresh basil.
- Use as salad toppers.
You can follow these to consume pistachios more healthily.
Pistachio Side Effects
We have already discussed all the nutrition facts and how pistachios can be beneficial for your body. But there are some side effects also that we should consider.
One of the significant side effects is high blood pressure. Besides, taking large amounts of pistachios can cause high blood sodium levels, hypertension, and fainting.
As we know, pistachios contain a high level of fiber. It can directly affect your digestive system, causing allergies, nausea, and itchiness.
Another significant side effect is inducing the risk of kidney stones, weight gain, increased risk of heart disease, and bowel problems. Also, high manganese levels in pistachios can be problematic for pregnant women.
So, be careful while consuming pistachios and don’t take too much all at once.
FAQs
Are pistachios good for weight loss?
Yes, pistachios are good for weight loss. Pistachios are full of protein and calories. So, consuming these can give you the feeling of fullness and lead you to consume less food.
Are pistachios fattening?
Yes, pistachios can be fattening if you take too many pistachios. Pistachios contain a high amount of calories and fat. So if you cannot lose those calories, this might cause fattening.
Do pistachios cause constipation?
No, pistachios don’t cause constipation. As we know, pistachios are rich in fiber, easing the process of constipation.
How many pistachios a day to lower cholesterol?
There is no exact amount of how many pistachios you should take. But you can take three to four ounces or two to three pistachios daily, lowering cholesterol levels.
Conclusion
We hope the answer to the question, are pistachios healthy or not. Pistachios are rich in nutrients such as thiamine, manganese, vitamin b6, calcium, potassium, phosphorus, and copper.
Pistachios also come with many health benefits. It can help you improve your weight management, promote blood health and reduce the risk of many diseases. Though, don’t take too many pistachios, which can lead to many side effects.
Good luck!
Related Posts


Subscribe for New Racipies
Get mental health tips, updates, and resources delivered to your inbox.