
Devil’s Food Cake With Swiss Meringue Buttercream

Medically reviewed by Christiana George Updated Date: June 8, 2023
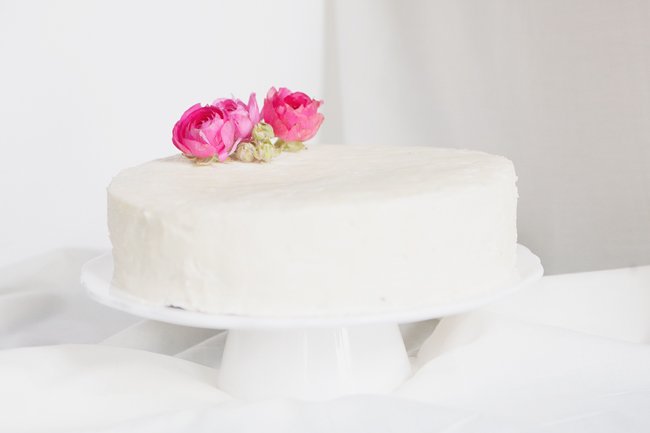
I’m not sure how it happened, but suddenly everything in my life revolves around wedding. I find all the different parts hard to keep track of, especially that big looming figure known as the Budget, but as long as I keep hacking away at different parts, I know I’ll eventually cleave a path through this maze of dresses, flowers, tea lights, stationery, and so so so much more.
While I manage to compartmentalize the wedding talk, only indulging in it in short spurts (although my sister gets the brunt of it), I did think it would be fitting to begin a discussion on… the wedding cake. Because I plan on making my own! This explains the uncharacteristically bright photo above.
Any of you who have spent any time at all reading any wedding blogs will surely be familiar with that sensation of one’s brain becoming scrambled/brainwashed by the extreme girliness and frilliness of their content. Recurring themes: lace, pom poms, rose petals, long tables festooned with flowers, peach, blush and pink, macarons, lace, mason jars, headless shots of the bride holding the bouquet, more lace, and toppling multi-tiered cakes.
I, for one, am not a fan of fondant. What exactly is it anyway? And is it really edible? I’m only half joking.
While I’m not an extremely crafty person, I’m convinced that the day will be all the better if I involve myself in it in a tangible sense. This applies strongly to some areas, the wedding cake being one of them. I don’t think I’ve ever considered outsourcing the making of the wedding cake, partly because I’ve had way too many slices of cake-gone-wrong, and partly because I’ve got a secret weapon: my sister. (She’s a star.) While it would be lovely if every aspect of the wedding were made with love, I at least have control over the cake.
The problem is that I don’t have a whole lot of cake-baking experience. Nearly none, actually. I’ve made one other layer cake in my life, and it came out… homely-looking. This cake came out homely-looking as well, but I’d prefer to go with the euphemism “rustic.” It is a little prettier, but its surface gently undulates, like the ocean on a calm day. Nice imagery when describing the scenery, but not ideal when applied to a cake. Also, upon closer inspection, the observer will realize that the vanilla-bean-like flecks are actually stray crumbs that got mixed with the icing. Note to self: buy an icing spatula and stop using one’s bread knife to spread icing.
Anyway, as you can see, I have a lot to learn about the art of cake-making. But I also have seven months to master the art, and I’m not going to stress it. An unprepossessing self-made cake has its own merits.
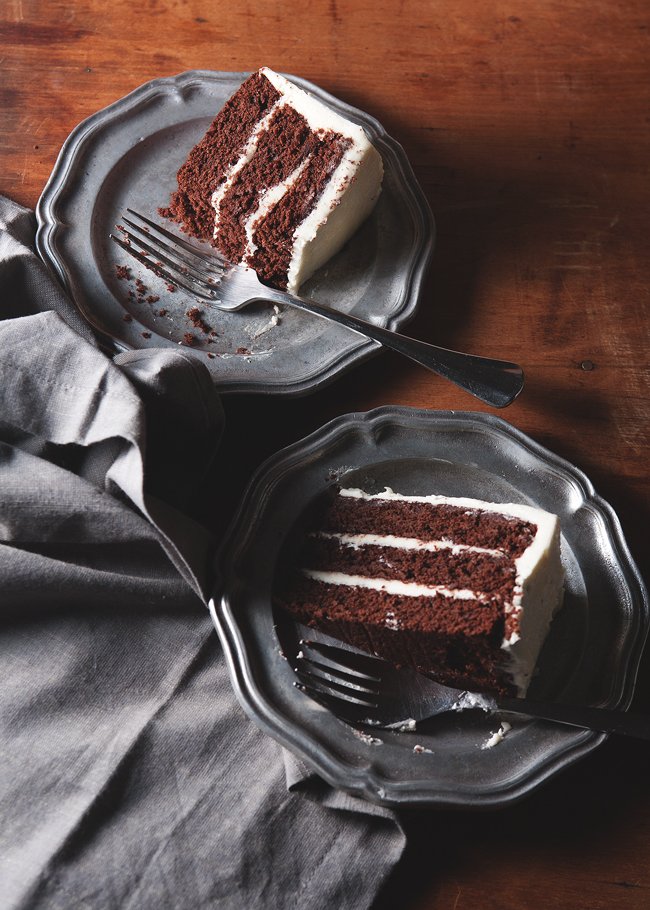
In this case, its parts: a wonderfully moist devil’s food cake, the recipe I got from the Tartine Bakery cookbook, and a luscious Swiss meringue buttercream. I decided my first forays into cake-making had to begin with the likeliest cake combination we would end up choosing, and probably, quite simply, my favorite cake combination of all. For what could be more satisfying than a moist slice of chocolate cake swathed in Swiss meringue buttercream? To me, nothing. To Chris, a moist slice of chocolate cake swathed in ganache, but we’re not going to go there because our cake has to be white-colored, dangit!
I chose this particular cake recipe because in the description beforehand, Elisabeth Prueitt mentioned that one of her bakery managers used the recipe for her wedding cake. That means it passes the tests in both sturdiness and the ability to stay fresh-tasting after sitting out for awhile.
In addition, the frosting is my absolute favorite. Swiss meringue buttercream looks beautiful patted onto a cake, and it tastes phenomenal: soft, light, very delicately sweet. My only issue with it is that it turns sort of stale after awhile, and tastes more buttery than sweet. Also, it turned slightly yellow after sitting out, but I very well could’ve done something wrong. Does anyone have any ideas on why this happened and how to correct this?
So, cake number one turned out okay. But other flavors await, and I hope to get better at decorating!


DEVIL’S FOOD CAKE
From Tartine
Makes one 9-inch cake (serves 12 to 16)
Ingredients:
1-3/4 cups all-purpose flour
4-1/2 Tbsp corn starch
1 tsp baking powder
1/2 tsp baking soda
1-1/4 cups cocoa powder
1 tsp salt
1 cup (2 sticks) unsalted butter, room temperature
2-3/4 cups sugar
5 large eggs
1-1/4 full-fat buttermilk
Directions:
Preheat the oven to 350 degrees F. Butter and lightly flour the sides of two 9-inch cake pans, knocking out excess flour. Line the bottom of each pan with parchment paper cut to fit exactly.
Sift together flour, corn starch, baking powder, baking soda, cocoa powder, and salt into a bowl and set aside. In the bowl of a stand mixer fitted with the paddle attachment, beat the butter on medium-high speed until light and creamy. Slowly add the sugar and continue to beat on the same speed until light in color and fluffy. Add the eggs one at a time, mixing well after each addition until incorporated before adding the next egg. Stop the mixer and scrape down the sides of the bowl with the rubber spatula. With the mixer on low, add the flour mixture in 3 equal batches, alternating with the buttermilk in 2 batches. Stop the mixer, scrape down the sides of the bowl, and mix again for another few seconds.
Divide the cake batter evenly between the prepared cake pans. Bake until the top springs back when lightly touched or a cake tester inserted into the middle comes out clean, about 45 minutes. Let the cakes cool completely before taking them out. To do so, invert the pans, then turn the cakes upright.
Use a serrated knife to slice off the domed portion of the top of each cake so the tops are flat. You can now slice your cakes into further layers, but read the note below.
Note: I ended up only being able to frost 3/4 of the cake using the recipe below. I had to leave out the fourth layer altogether, and I frosted quite sparingly, so if you plan on creating slicing your cakes into multiple layers, I would double the amounts listed below. You should then be able to go crazy with the frosting (but probably not this crazy.).
SWISS MERINGUE BUTTERCREAM
Makes 5 cups
From Sweetapolita
For a truly comprehensive how-to on making Swiss meringue buttercream, hop over to Rosie’s blog (link above). Sooo helpful.
Ingredients:
5 large, fresh egg whites
1-1/4 cups sugar
1-1/2 cups unsalted butter, cut into cubes and cool, but not cold
2 tsps pure vanilla extract
pinch of salt
Directions:
Start out with a clean electric mixer bowl. Add egg whites and sugar, and whisk the mixture gently over a pot of water (not boiling), until temperature reaches 160 degrees F. Don’t let the bottom touch the water, or the eggs will cook. If you don’t have a candy thermometer, heat until the sugar has completely dissolved and the egg whites are hot.
With whisk attachment of a mixer, begin to whip until the meringue is thick, glossy, and the bottom of the bowl feels neutral to the touch (this can take up to 10 minutes or so). Don’t begin adding butter until the bottom of the bowl feels neutral, and not warm.
Switch over to paddle attachment and, with mixer on low speed, add butter cubes, one at a time, until incorporated and mix until it has reached a silky smooth texture. It will probably look hopelessly curdled after you add the butter, but if you keep mixing, it will smooth out, trust me. (Rosie notes that if mixture is too runny, refrigerate for about 15 minutes and continue mixing with paddle attachment until it comes together.) Add vanilla and salt, continuing to beat on low speed until well combined.
Related Posts


Subscribe for New Racipies
Get mental health tips, updates, and resources delivered to your inbox.
Is Brown Sugar Acidic? Brown Sugar and Acid Reflux

Acid reflux is a pervasive condition that affects millions of people globally, disrupting daily life with symptoms like heartburn, regurgitation, and discomfort in the chest. The primary cause is stomach acid flowing back into the esophagus, often due to a weakened lower esophageal sphincter (LES). While occasional reflux can be a nuisance, chronic acid reflux, known as Gastroesophageal Reflux Disease (GERD), requires careful management to prevent further complications such as esophagitis or Barrett’s esophagus.
A key factor in managing acid reflux is dietary choices. Certain foods and beverages can exacerbate symptoms, while others may alleviate discomfort. Sweeteners like brown sugar often raise questions: Is it acidic, and could it aggravate acid reflux? Understanding the properties of brown sugar, including its pH level, and its effects on the digestive system is crucial. In this article, we’ll break down the science behind brown sugar’s acidity, its connection to acid reflux, and alternative sweeteners that might be gentler on your stomach.
What is Brown Sugar?
Composition and Difference from White Sugar
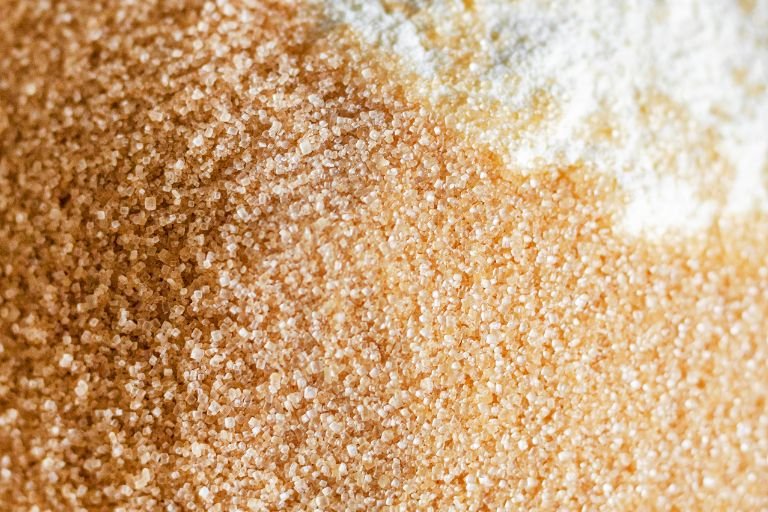
Brown sugar is essentially white sugar with added molasses, giving it its characteristic color, flavor, and moisture content. Unlike white sugar, which is refined and stripped of impurities, brown sugar retains a small percentage of molasses, contributing to its slightly richer taste.
Nutritional Composition of Brown Sugar
To better understand its potential impact on acid reflux, let’s examine the nutritional profile of brown sugar:
| Nutrient | Amount per 100g | Comment |
| Calories | 380 kcal | High caloric content, similar to white sugar. |
| Carbohydrates | 98 g | Primarily simple sugars. |
| Sugars | 96 g | Includes glucose and fructose. |
| Calcium | 85 mg | Derived from molasses content. |
| Potassium | 130 mg | Trace amount beneficial for health. |
| Iron | 0.71 mg | Present in small quantities. |
While brown sugar offers minimal minerals like calcium and potassium due to its molasses content, its nutritional differences from white sugar are not significant enough to consider it a health food.
pH Level of Brown Sugar
The pH level of brown sugar typically ranges from 5.0 to 6.0, making it slightly acidic. While it is not as acidic as lemon juice or vinegar, its acidity level can still influence those sensitive to acidic foods.
Is Brown Sugar Acidic?
Scientific Explanation of Its Acidity
Acidity is measured on a pH scale, where values below 7 are acidic, and values above 7 are alkaline. Brown sugar falls on the acidic side due to its molasses content. Molasses, being mildly acidic, slightly lowers the pH of brown sugar compared to white sugar, which has a nearly neutral pH.
Comparison with White Sugar and Natural Sweeteners
- White Sugar: With a pH closer to neutral (around 7), white sugar is less acidic than brown sugar. However, its effect on acid reflux is similar due to its high glycemic index and refined nature.
- Natural Sweeteners: Alternatives like honey (pH 3.9–4.5), maple syrup (pH 5.5–7), and stevia (neutral) may offer better options for acid reflux sufferers due to their varying pH levels and lower glycemic impact.
Brown Sugar and Acid Reflux
Can Brown Sugar Trigger Acid Reflux?
Brown sugar may contribute to acid reflux symptoms for some individuals. While it is only mildly acidic, the real issue lies in its impact on the digestive system:
- High Sugar Content: Excess sugar consumption can lead to increased stomach acid production, which may trigger acid reflux.
- Molasses Content: Though minor, the acidic molasses in brown sugar may irritate sensitive individuals.
- Indirect Triggers: Consuming sugary foods can lead to weight gain, a known risk factor for acid reflux.
Benefits and Risks of Consuming Brown Sugar for Acid Reflux Sufferers
- Benefits:
- Slightly less refined than white sugar, which may be marginally better for some.
- Trace minerals from molasses could contribute to nutritional diversity.
- Risks:
- Increased acid production in the stomach.
- Potential for triggering heartburn if consumed in large quantities.
For those with acid reflux, moderation is key. A small amount of brown sugar might not cause symptoms, but frequent or excessive use could exacerbate issues.
Alternative Sweeteners for Acid Reflux
Low-Acid Natural Sweeteners
For those looking to reduce acid reflux symptoms, consider these alternatives:
- Honey:
- Natural and slightly acidic.
- Known for soothing throat irritation caused by acid reflux.
- Maple Syrup:
- Ranges from mildly acidic to neutral.
- Less processed and has a unique flavor.
- Stevia:
- A natural, zero-calorie sweetener with a neutral pH.
- Ideal for those managing both acid reflux and blood sugar levels.
- Coconut Sugar:
- Low glycemic index.
- Slightly acidic but often better tolerated than refined sugars.
Exploring Sugar Substitutes for Acid Reflux Relief
Managing acid reflux often involves making strategic dietary adjustments, and one effective approach is substituting traditional sugars like brown sugar with alternatives that are gentler on the stomach. Sugar substitutes can offer several benefits, such as lower acidity levels, reduced impact on stomach acid production, and, in some cases, added health benefits like lower calorie content or additional nutrients.
Natural sweeteners like honey, stevia, and maple syrup are popular choices among individuals with GERD. Honey, for example, is known for its soothing properties, which can help coat the esophagus and alleviate irritation caused by acid reflux. Stevia, a zero-calorie natural sweetener, is pH-neutral and less likely to exacerbate symptoms compared to refined sugars. Maple syrup, ranging from mildly acidic to neutral, offers a flavorful alternative that is often better tolerated by those with sensitive stomachs.
Additionally, sugar substitutes like coconut sugar and erythritol have a lower glycemic index and may help reduce overall acid production in the stomach, making them viable options for long-term dietary management. Experimenting with these alternatives can help find the right balance between satisfying your sweet tooth and avoiding reflux flare-ups.
Author Tip: Sugar Defender Reviews: Does It Really Work?
Why Choose Alternatives?
Switching to these sweeteners can:
- Lower the likelihood of triggering acid reflux.
- Provide added nutrients and health benefits.
- Reduce overall sugar intake, aiding in weight management—a crucial factor in controlling GERD symptoms.
Conclusion
Brown sugar, while mildly acidic, may not be the primary culprit in triggering acid reflux for most individuals. However, its sugar content and slight acidity can aggravate symptoms in sensitive individuals when consumed in large amounts. For those managing acid reflux, it’s essential to adopt a balanced approach by moderating sugar intake and opting for natural, low-acid sweeteners where possible.
Understanding your body’s reactions to certain foods is key. Consulting a healthcare provider for personalized dietary advice can help you make informed choices and effectively manage acid reflux symptoms.
FAQs
1. Is brown sugar good for acid reflux?
Brown sugar is not inherently good or bad for acid reflux. Its mild acidity and sugar content can trigger symptoms in sensitive individuals, but moderate consumption may not cause issues for everyone.
2. How does brown sugar compare to white sugar for acid reflux?
Brown sugar is slightly more acidic due to its molasses content. However, its overall impact on acid reflux is similar to white sugar.
3. Can brown sugar cause heartburn?
In some individuals, brown sugar can cause heartburn, especially when consumed in large amounts or as part of a high-sugar diet.
4. Are there better sweeteners for acid reflux?
Yes, alternatives like honey, stevia, and maple syrup are often better for acid reflux sufferers due to their lower acidity and potential health benefits.
5. What are other dietary tips for managing acid reflux?
- Avoid highly acidic foods like citrus and tomatoes.
- Eat smaller meals to prevent overloading the stomach.
- Stay upright after eating and avoid eating late at night.
Related Posts


Subscribe for New Racipies
Get mental health tips, updates, and resources delivered to your inbox.